

Coop 4.0
The information in this post is not sponsored and is intended only as a glimpse of how we do backyard chickens around here, not as advice on how to raise chickens, in general. Links to some of my favorite backyard chicken resources and products can be found at the end. If you'd rather just have a tour of the coop and Chicken Garden without all the chicken keeping info, hop on over here.
Coop 4.0...Yes. We have remodeled our chicken coop four times in seven years. What.
I have this little personal issue (shall we call it Restless Coop Syndrome?) where, when I see how something could be done better, I lose sleep over it until it gets fixed. When we first got chickens, and sort of dove right into building a coop, we really just didn't know a damned thing and did the best we could with the money and skillzzzz we had. Spoiler alert: we didn't have much of either.
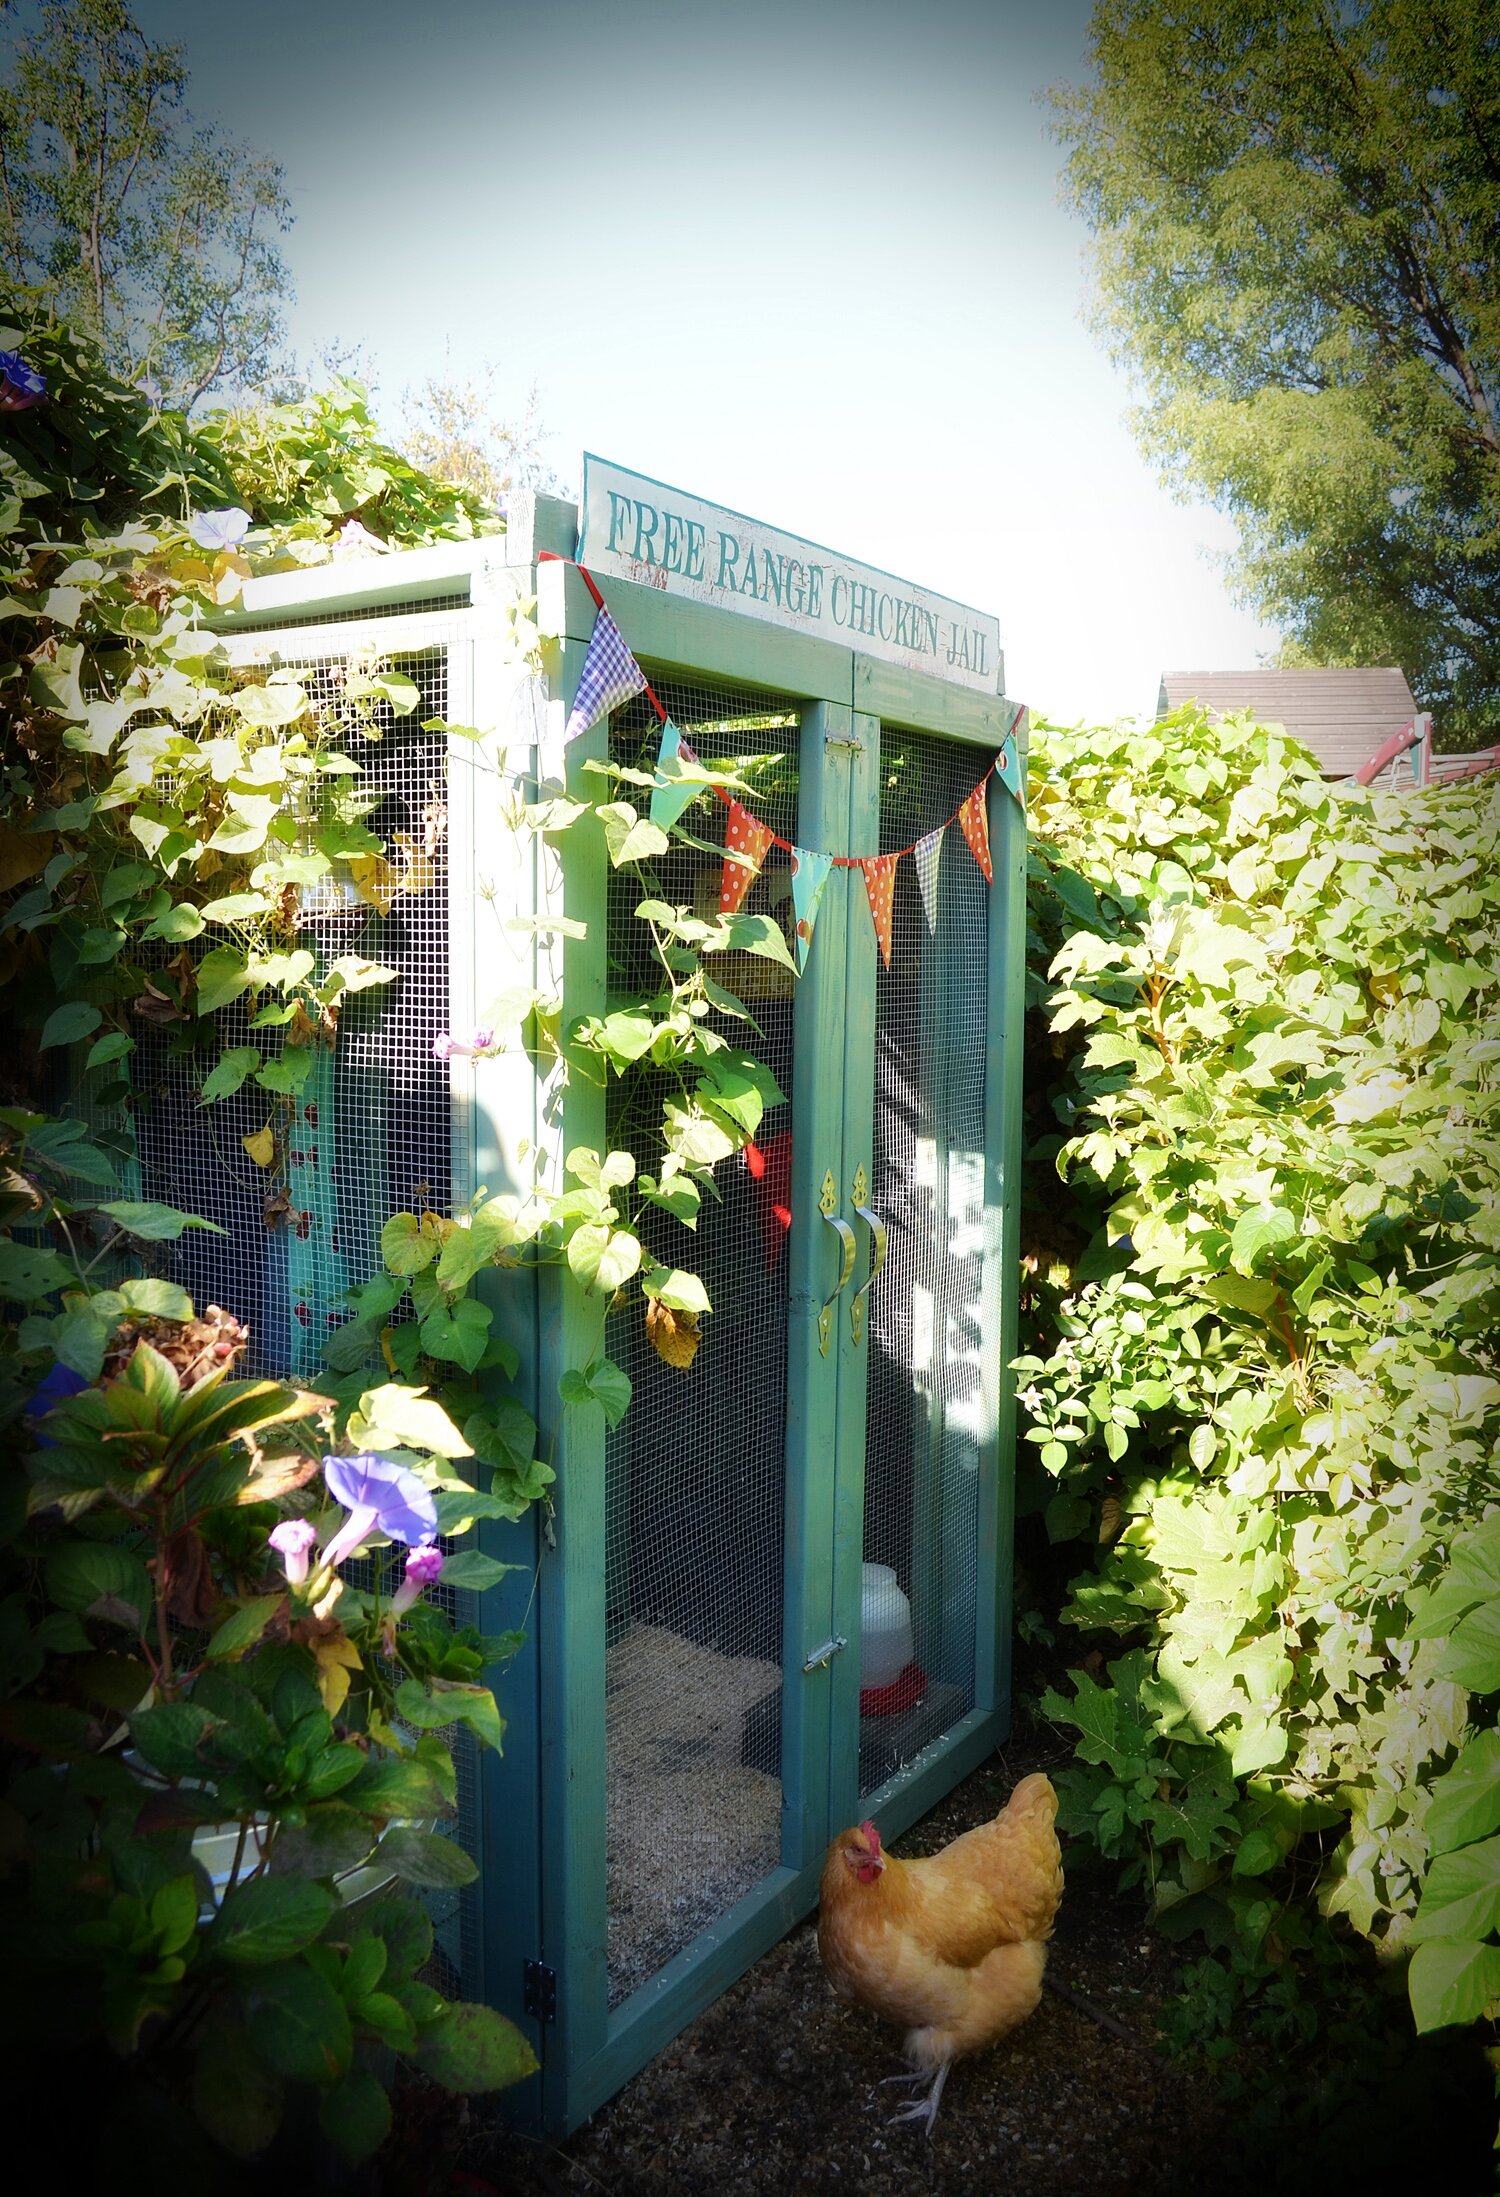
The OG coop.
At first glance, this coop probably looks fine. I mean...it was fine. I could wax poetic about all that was wrong with it, but I think it will be more fruitful to elaborate on what is right (for us) about our current coop.
Also it should be noted: man, did I love a good vignette effect on my photos back then. Sheesh.
Also, also, it should be noted that when I first was researching chicken-keeping, I pretty much learned everything I know from Fresh Eggs Daily. I landed on Lisa Steele's natural chicken-keeping blog waaaaay back then (2011??!! When we got our first little chicks!) and her organic methods really resonated with me. For the past seven years of my backyard chickening, her's remains my go-to reference for all things poultry. If you are new to the chicken-keeping world, I highly recommend following her, as over the years her blog has become a comprehensive guide full of tips and how-tos on every possible aspect of this happy little lifestyle--and since then she has published a bunch of books on the subject (find them here).
Back to the coop: after a couple of reconfigurations of that first coop (which I count as version 2.0), we finally decided to scrap it and build the next version:
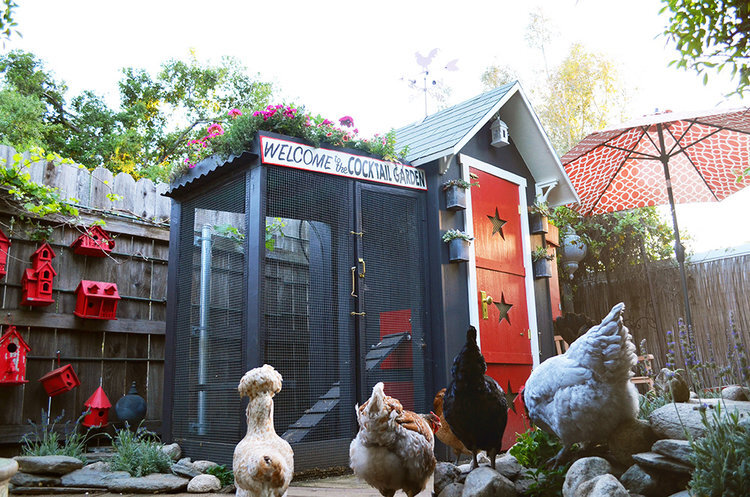
Again, this one had a lot of positives. Man did I love that green roof on the run. This coop was pretty functional for us for about four years. It's drawbacks were few; namely just that the run really wasn't big enough to lock the chickens in for long stretches of time (they free range in the chicken garden for the most part so this wasn't a HUGE deal), and in our efforts to make the henhouse as sound-proof as possible, we didn't get the ventilation quite right. Also, and very importantly, there was no really comfortable spot to lounge and drink with chickens. Still, overall, it worked pretty well for us.
See a full tour of this version, here.
But...yanno...I felt it could be better. So here we are:
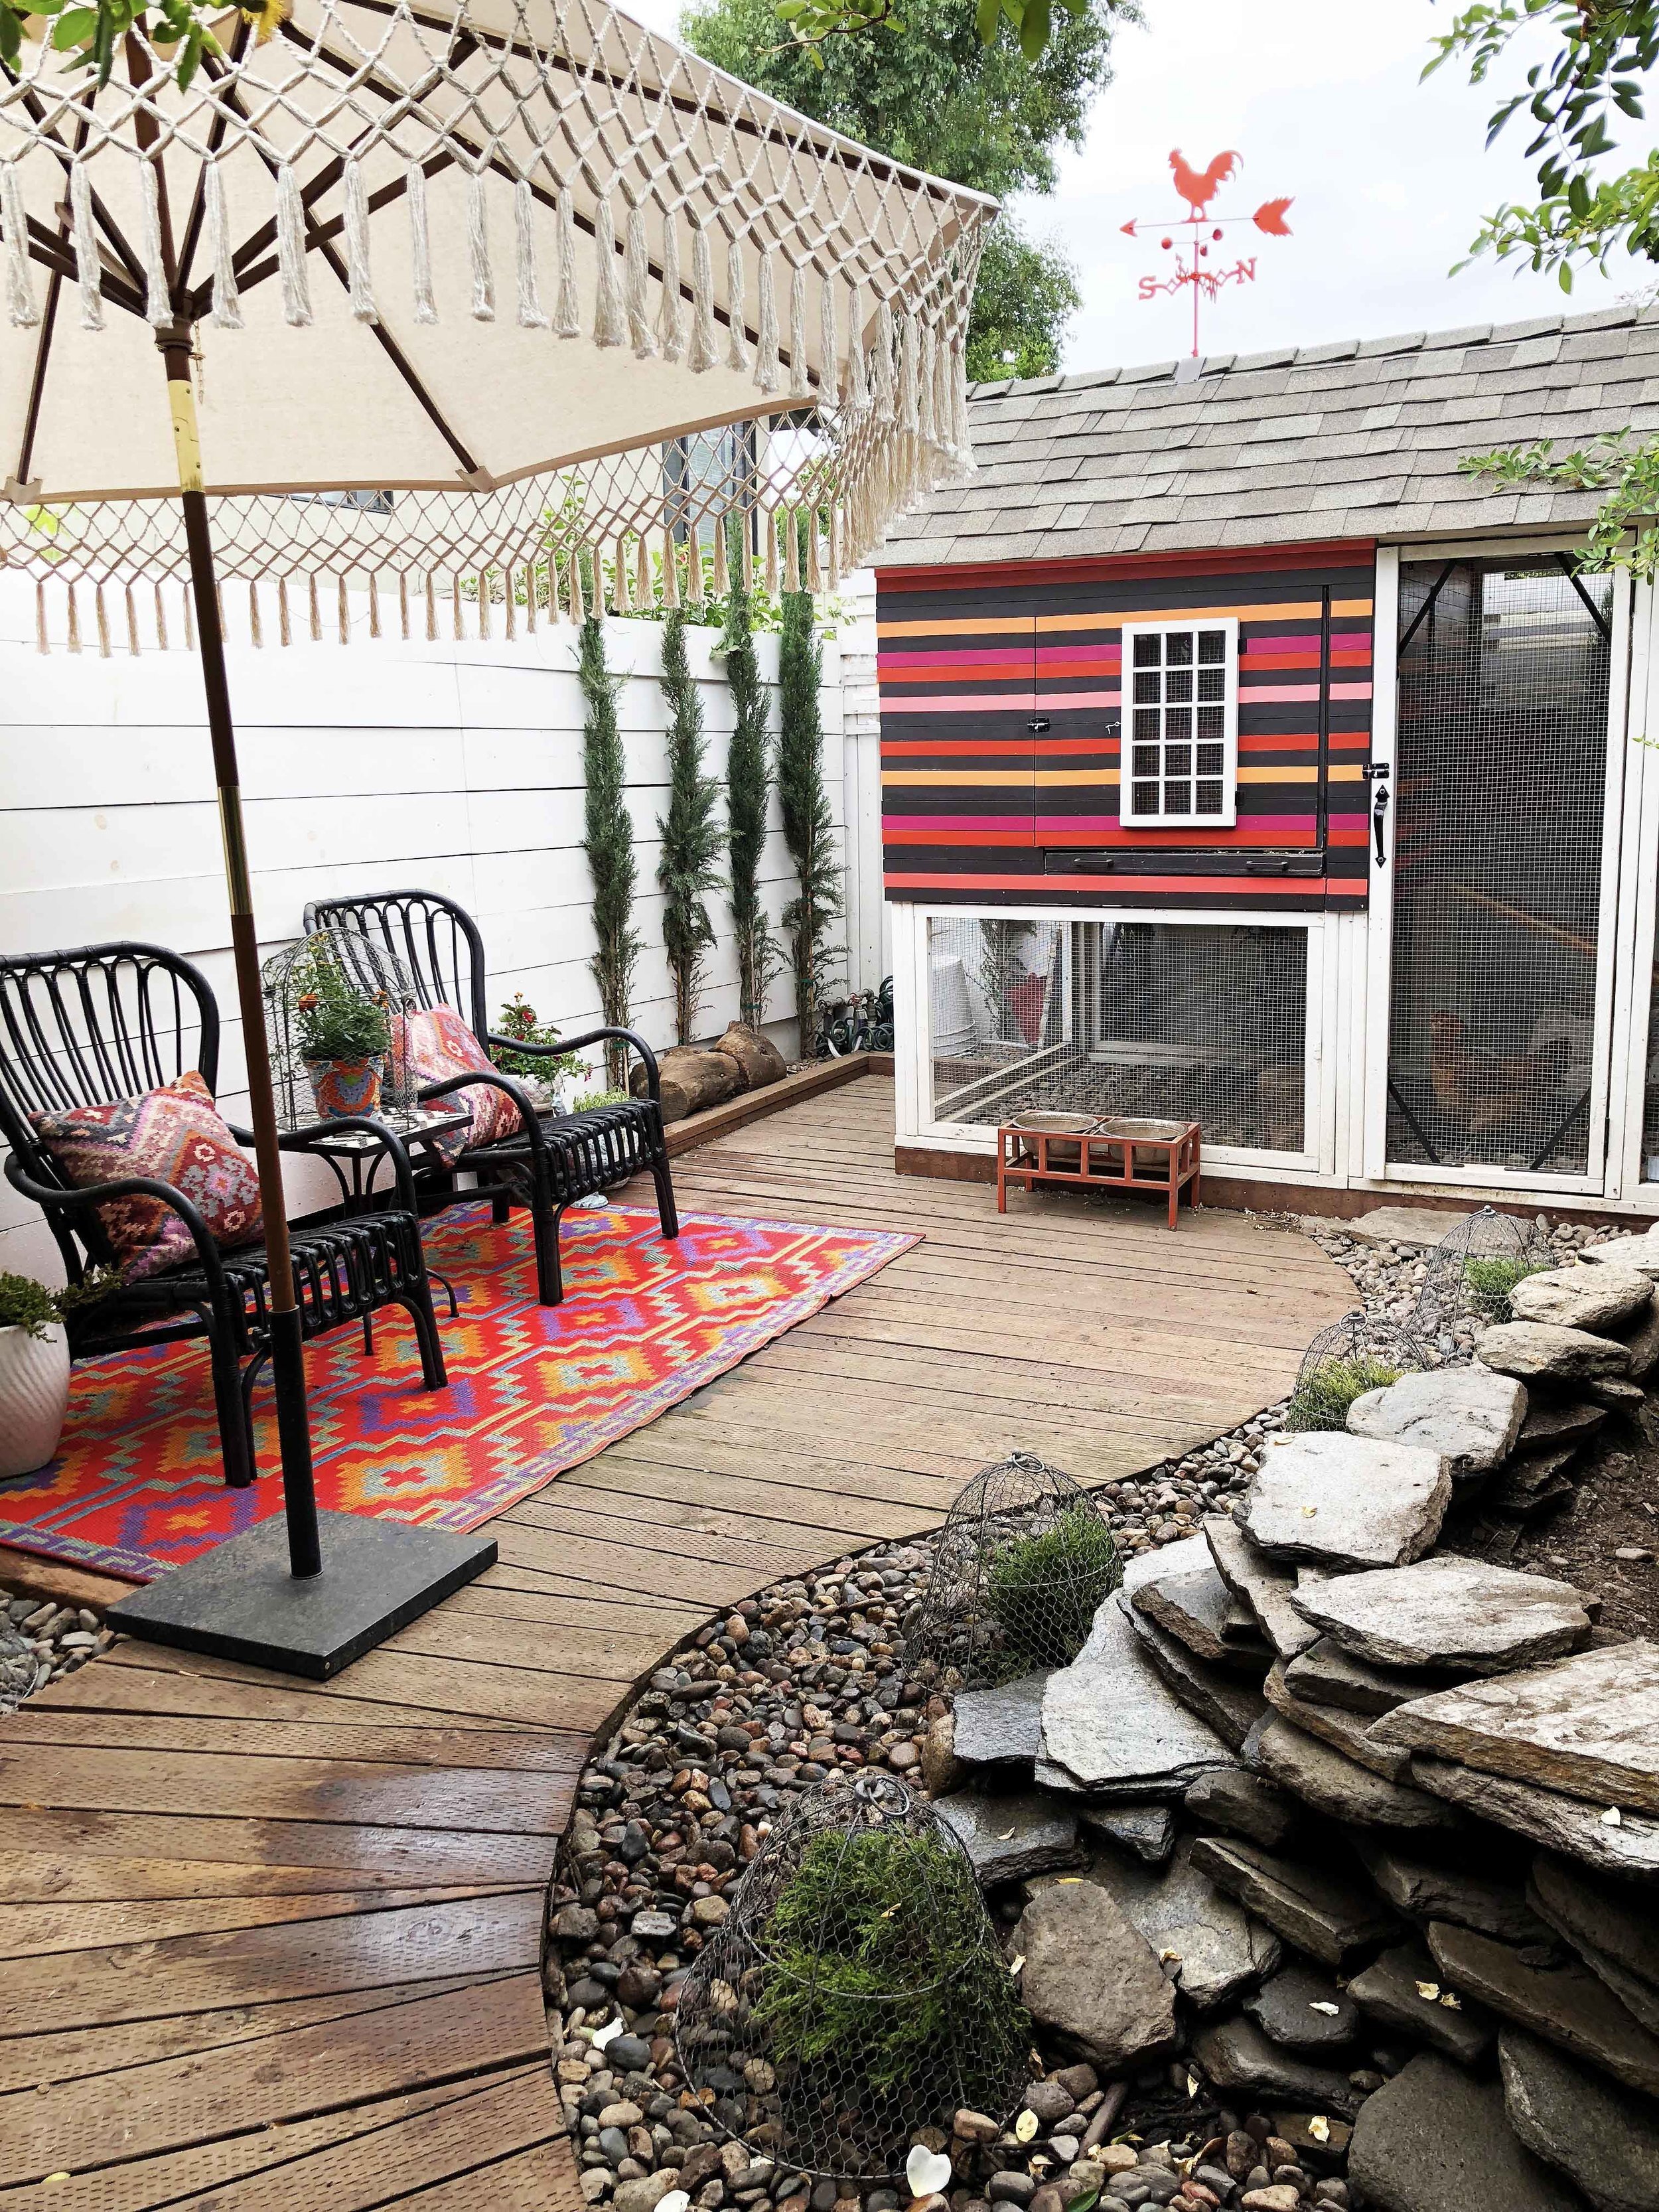
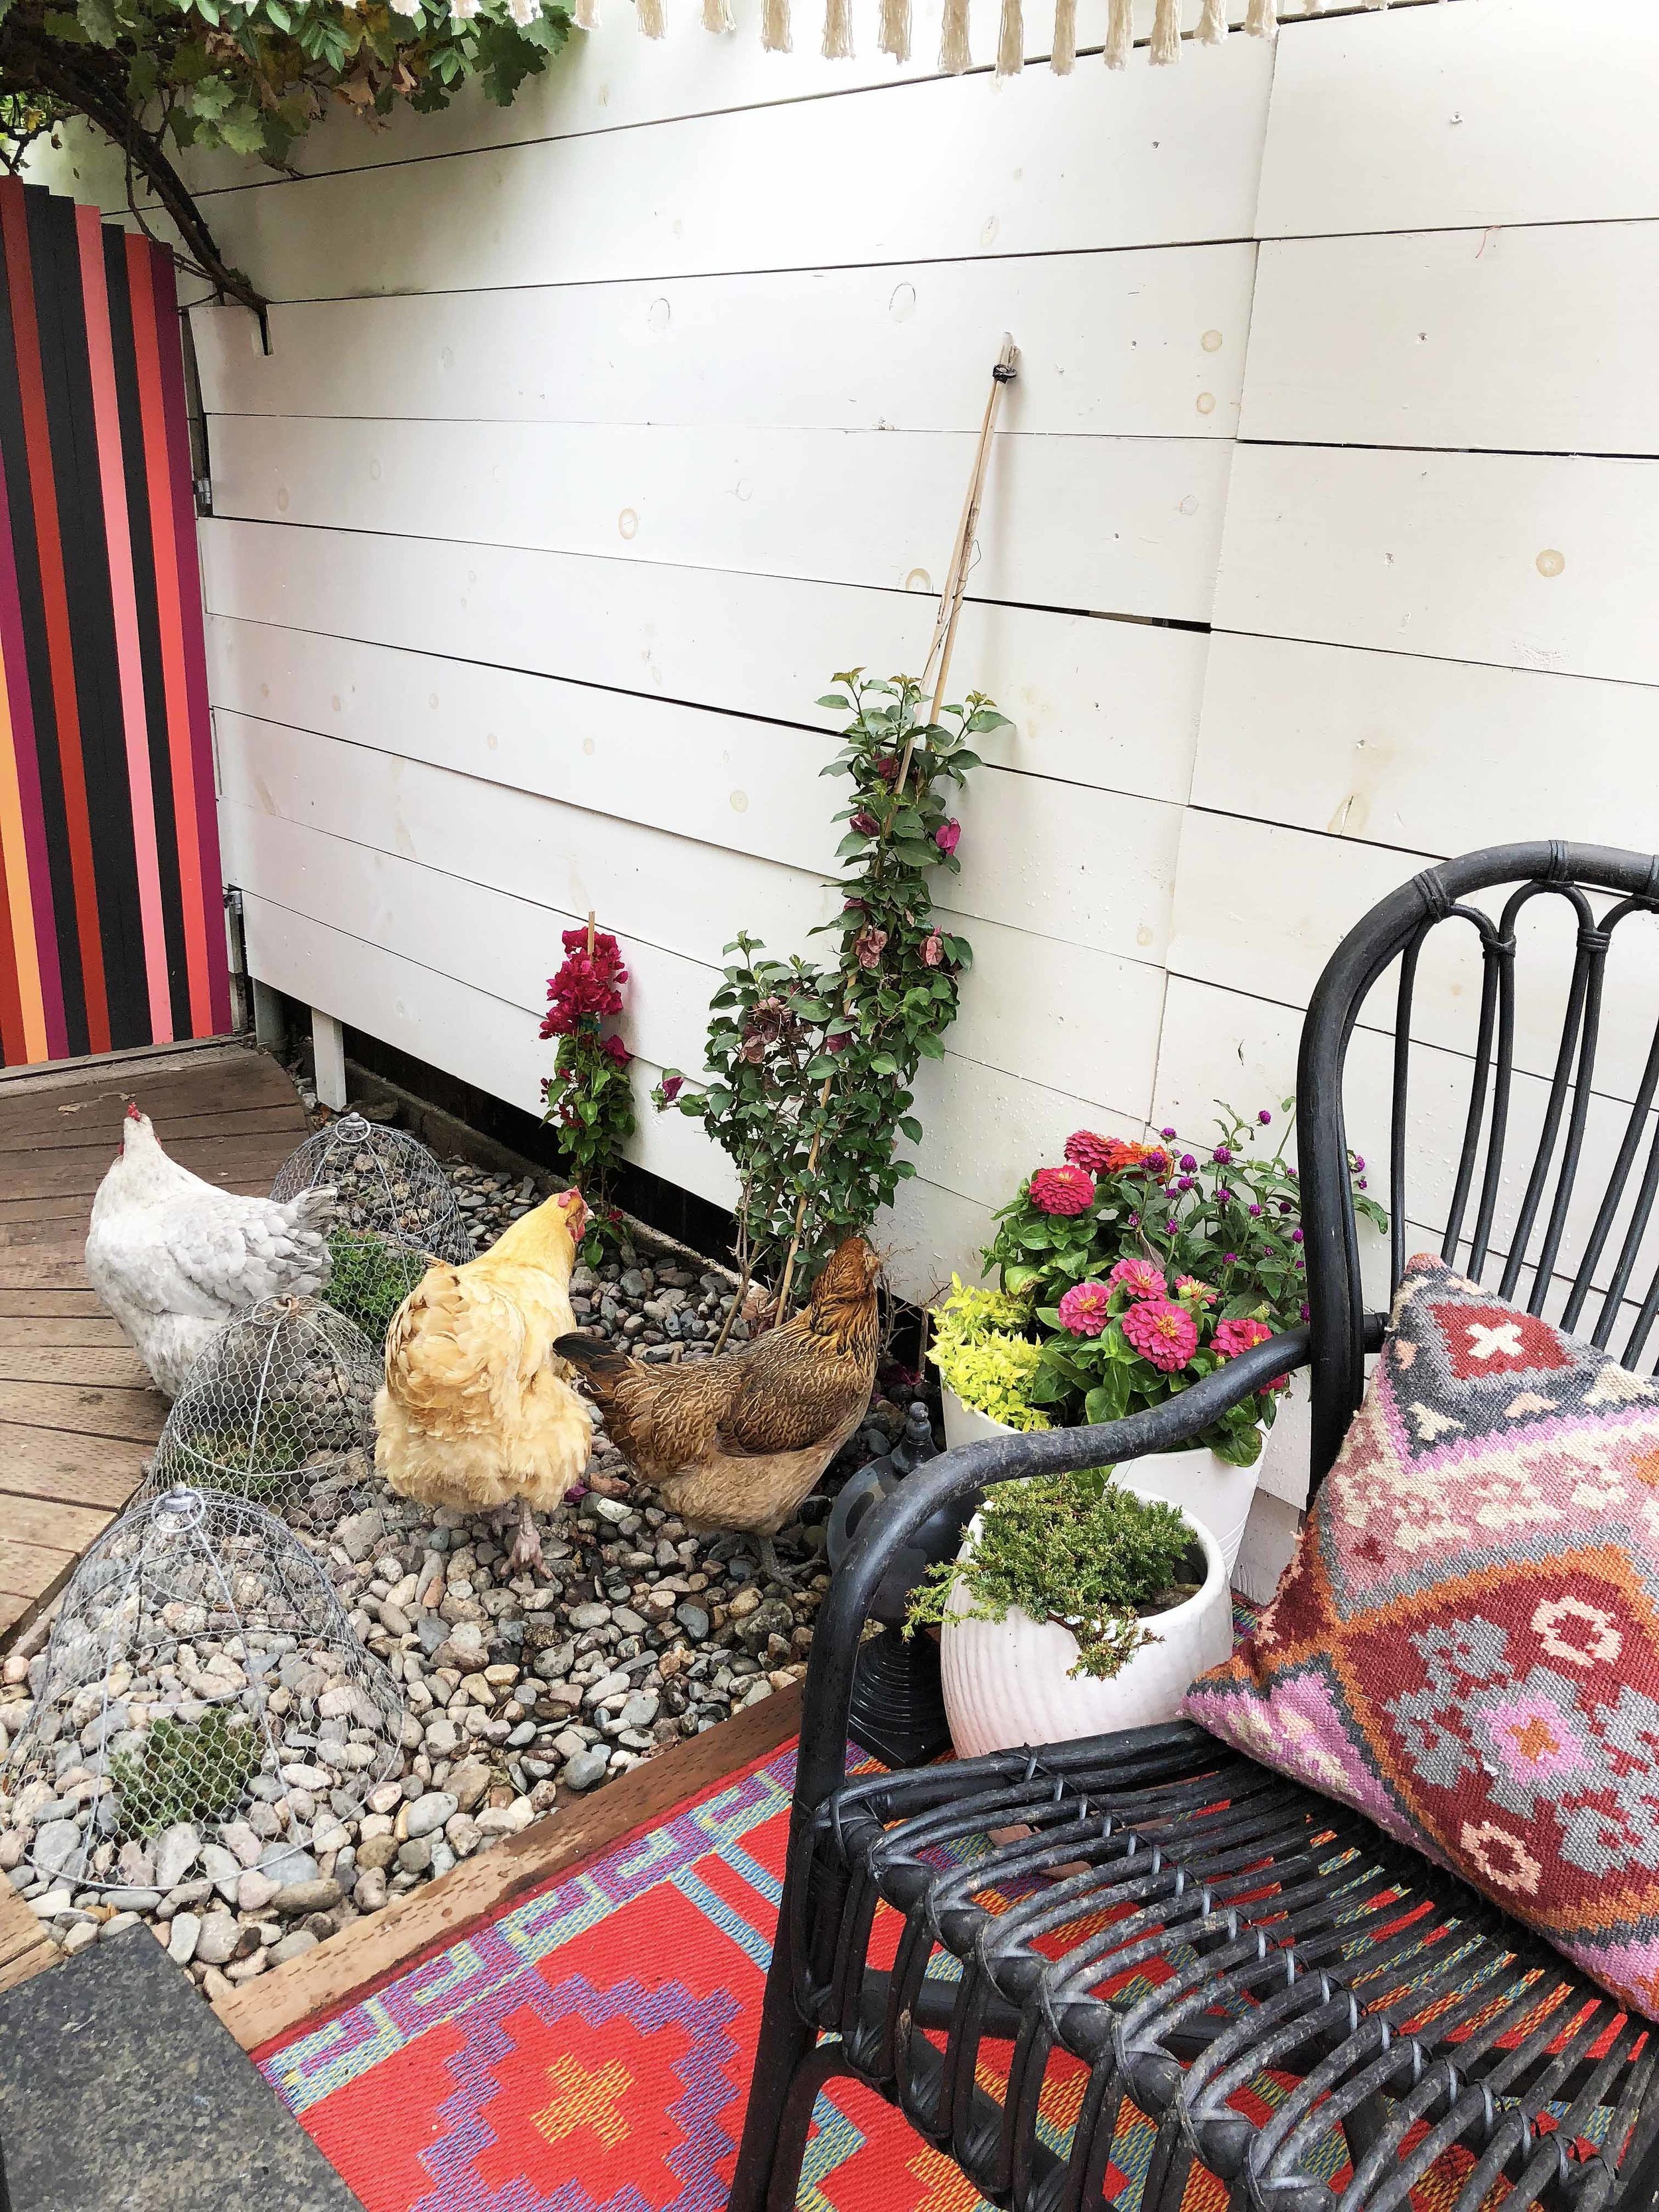
Allow me to explain what we did. Firstly, the chicken garden is a fairly tight space at the back of our property, about 15 feet deep by 25 feet wide. The last version of the coop sat right in the middle of that area up against the back fence, and it was kind of an awkward location (roughly where the lounge chairs are now in the above photos). So we moved it all the way to the west side of the yard to maximize space. This allowed us to have a MUCH bigger covered run which we were in desperate need of--a space big enough to have the chickens locked down in in pretty reliable safety (for when we are not home).
We built the coop completely from scratch. Trust me, we wanted to use a kit, but it seems like every available option out there had some major drawback for our situation (and yet still cost a pretty penny). So we figured we may as well put a little work into it and have it exactly the way we needed/wanted it.
Over the years, we have been through a lot of pathway and plant materials in the chicken garden. Grass, gravel, dirt, bark, rocks, herbs--you name it, we've tried it back there. We desperately needed a safe pathway, and quickly realized that it had to be some sort of hardscaping, because everything soft, the chickens dig up and rearrange. We were constantly rolling ankles and tripping on the little booby traps they'd lay for us. I'm not kidding---they dug covert little holes deliberately. D E L I B E R A T E L Y. At the same time, we did not want to just throw down a concrete pathway--there's a drainage issue back there and I like the idea of permeable surfaces (hello, SoCal drought) as opposed to concrete with drains that just drain all the water away. So, ultimately we decided to try a pressure-treated wood boardwalk (and here's where I get a lot of people pointing out that PT wood is full of chemicals that are probably leaching out everywhere--but we literally had to pick our poison with this one. There are pluses and minuses to EVERYTHING and we had to weigh all the factors. The chickens do walk across this surface, but they typically don't eat off of it--they spend the majority of their days pecking around in the adjacent raised dirt area and bordering gravel areas (is the adjacent dirt contaminated from the wood? Maybe. Is it contaminated from being an urban environment? Probably. Is painted wood better? Dunno. Redwood, if you can afford it? Ironwood? Maybe, maybe.)
Another reason why this walkway works so well for us is that I find it very easy to keep clean. I use a pooper scooper or a broom to scrape up and clean dry poop, and every once in awhile when it needs a deep clean I can hose it down (I know, I know: DROUGHT. But I said EVERY ONCE IN AWHILE). I place a lot of importance on the overall cleanliness of the coop and chicken garden. We are very close to our neighbors and out of respect for them, I want things to be as tidy and hygienic as possible--in fact, I think this is one of the most important elements of urban chicken keeping that people need to really consider whether they're up for before adding chickens to their backyard. That, and whether or not it's even legal to begin with (always check with your city ordinances before acquiring chickens). When you live way, way out in the country or on a big piece of property where your coop and chickens are far away from you and/or your neighbors--maybe it's not as big of an issue to be so vigilant about cleaning and aesthetics. I just like to know that if my neighbors are looking out their window, they're not looking at a giant mess (or smelling it).
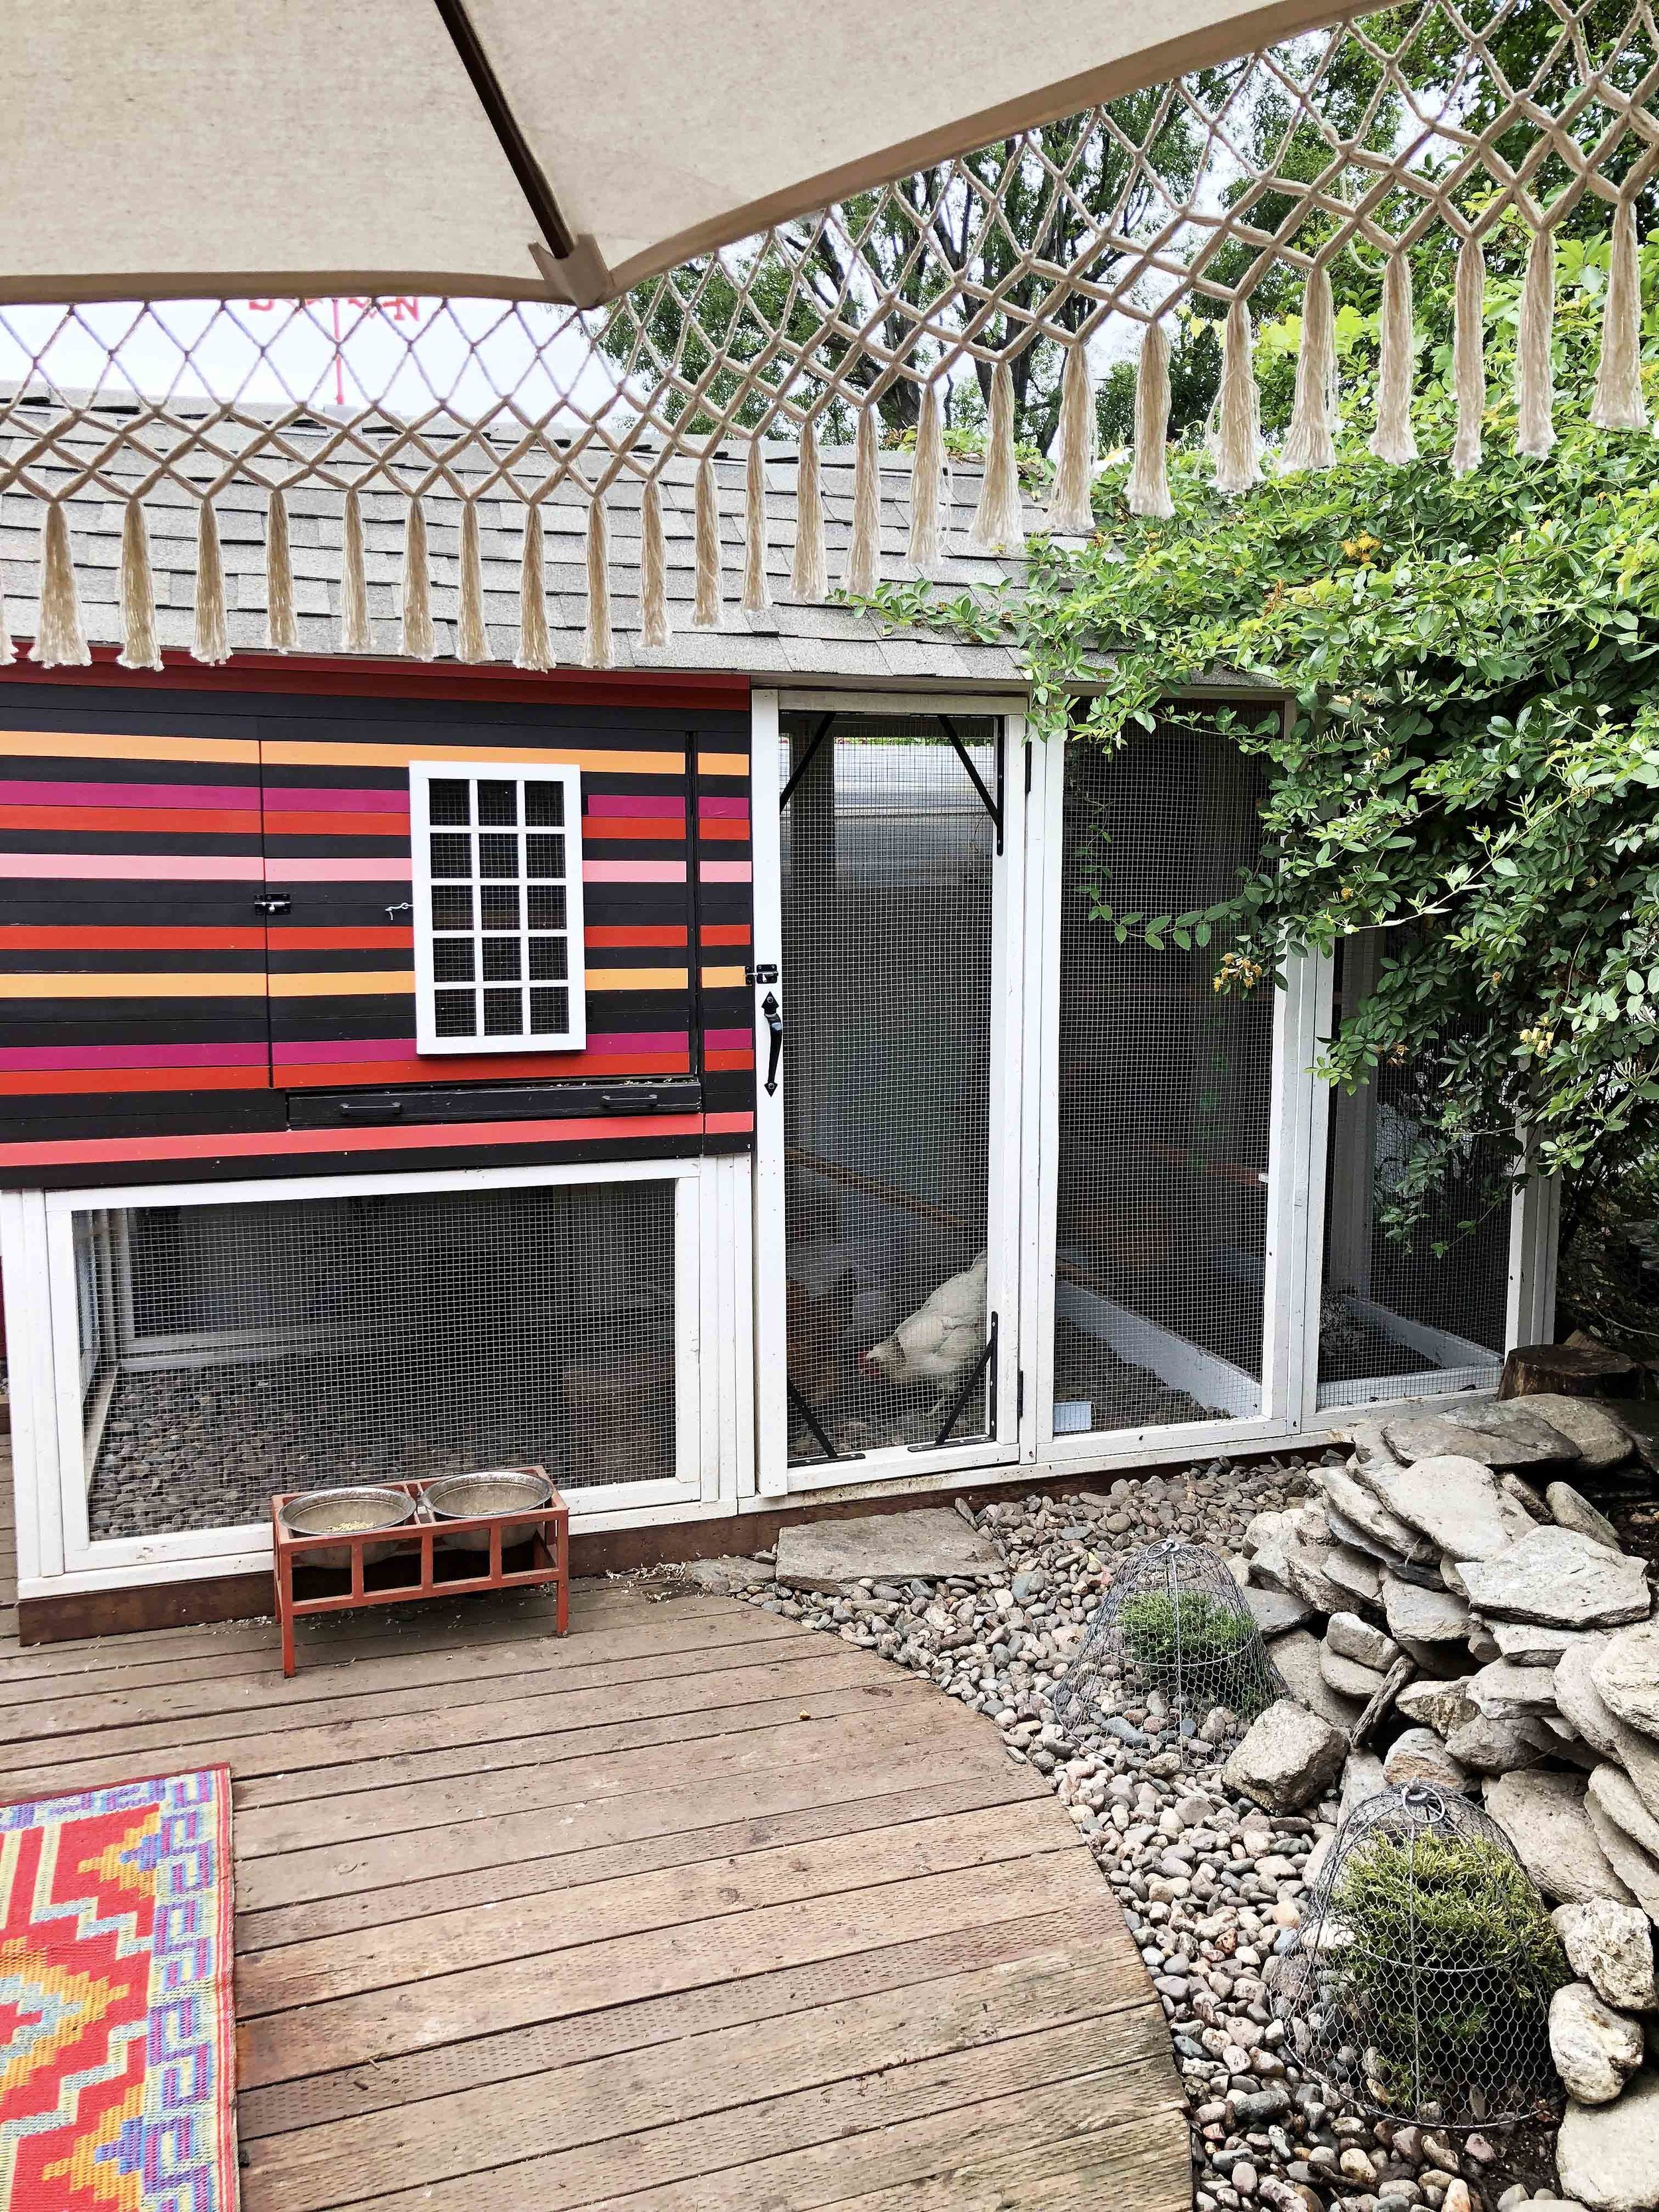
The boardwalk serves not only as a sturdy, permeable pathway that leads to the coop and run, but as a nice patio area where we keep a couple of lounge chairs that allow us to sit (and drink) with our girls.
This brings me to the gravel. We chose to use this not only as a sort of filler/mulch for the landscape areas (and by "landscape" I mean the scant few plants we get to survive the dedicated attentions of the chickens), but as a ground-cover for the coop run. It keeps the dirt and mud at bay, and from time to time, we hose it down to clean it (again, yes, I know we are in a drought, but we literally got rid of ALL of our lawns and have implemented very extreme water conservation methods across our entire property and within our household to offset the fact that we have to use water to keep our coop situation tidy). In the previous coop versions, we tried alllllll the different run floor materials: dirt (is great except when you have drainage issues and it becomes mud during the winter and rainy seasons...when we have those), straw (also great but very difficult to muck out in tight spaces, IMO), pine shavings (these are still my favorite, overall--we use them as bedding inside the hen house and nesting boxes, but as run flooring they escaped the run too much and went E V E R Y W H E R E), and we even had cement pavers at one point (worked okay but again, there was a drainage issue). The rocks are working SO well for us in our mediterranean-urban environment. I should note that we went with pond pebble-sized gravel because, while the chickens can move them around to some extent, they do so minimally. We had pea gravel for awhile as our garden path and MAN do they fling that stuff around--when I was talking about us rolling ankles and tripping and falling, the pea gravel was the main culprit. They had this way of digging very subtle, camouflaged holes that you couldn't quite see until you were stumbling into them. Evil little feathered geniuses.
A lot of people have asked me how we deal with pests. I feel like the most important part of pest control is cleanliness--which is another reason I'm kind of a psycho about keeping things clean. I think we are lucky in SoCal with our flies--we DO have them, but very few and they aren't bitey or bionic like it kind of sounds like they are elsewhere in the country. If I stay on top of the poop clean-up, they just really aren't very prevalent. But I will tell you this--they WERE more plentiful when I let the girls free range on the entire property, and it is definitely because when they were pooping across the whole yard, I wasn't able to find and clean it up as well. Keeping them in a more confined space not only keeps the poop centralized to one area of the property, it is easier to see and and get rid of. But you definitely gotta stay on top of it. Here's a great article from Fresh Eggs Daily about fly control. As for rodents and other furry critters, we absolutely do not feed our chickens inside the coop and run, only out in the garden, and we clean up and put away any leftover food at the end of every day--this really helps keep away the pests and predators. As for mites and ants, I spread diatomaceous earth as needed (which again, doesn't seem to be very often--I've never actually experienced mites with my chickens...just with my damned tomatoes). I especially like to spread DE into the chickens' dust bath areas. I've also had great success discouraging ants by sprinkling cinnamon around just like DE.

Adjacent to the coop is a dry-stacked flagstone raised dirt bath area. (This is where the birds spend the majority of their time, scratching and lounging and judging.) The sturdy chicken wire cloches from Gardeners.com protect new plants as they establish their little selves.
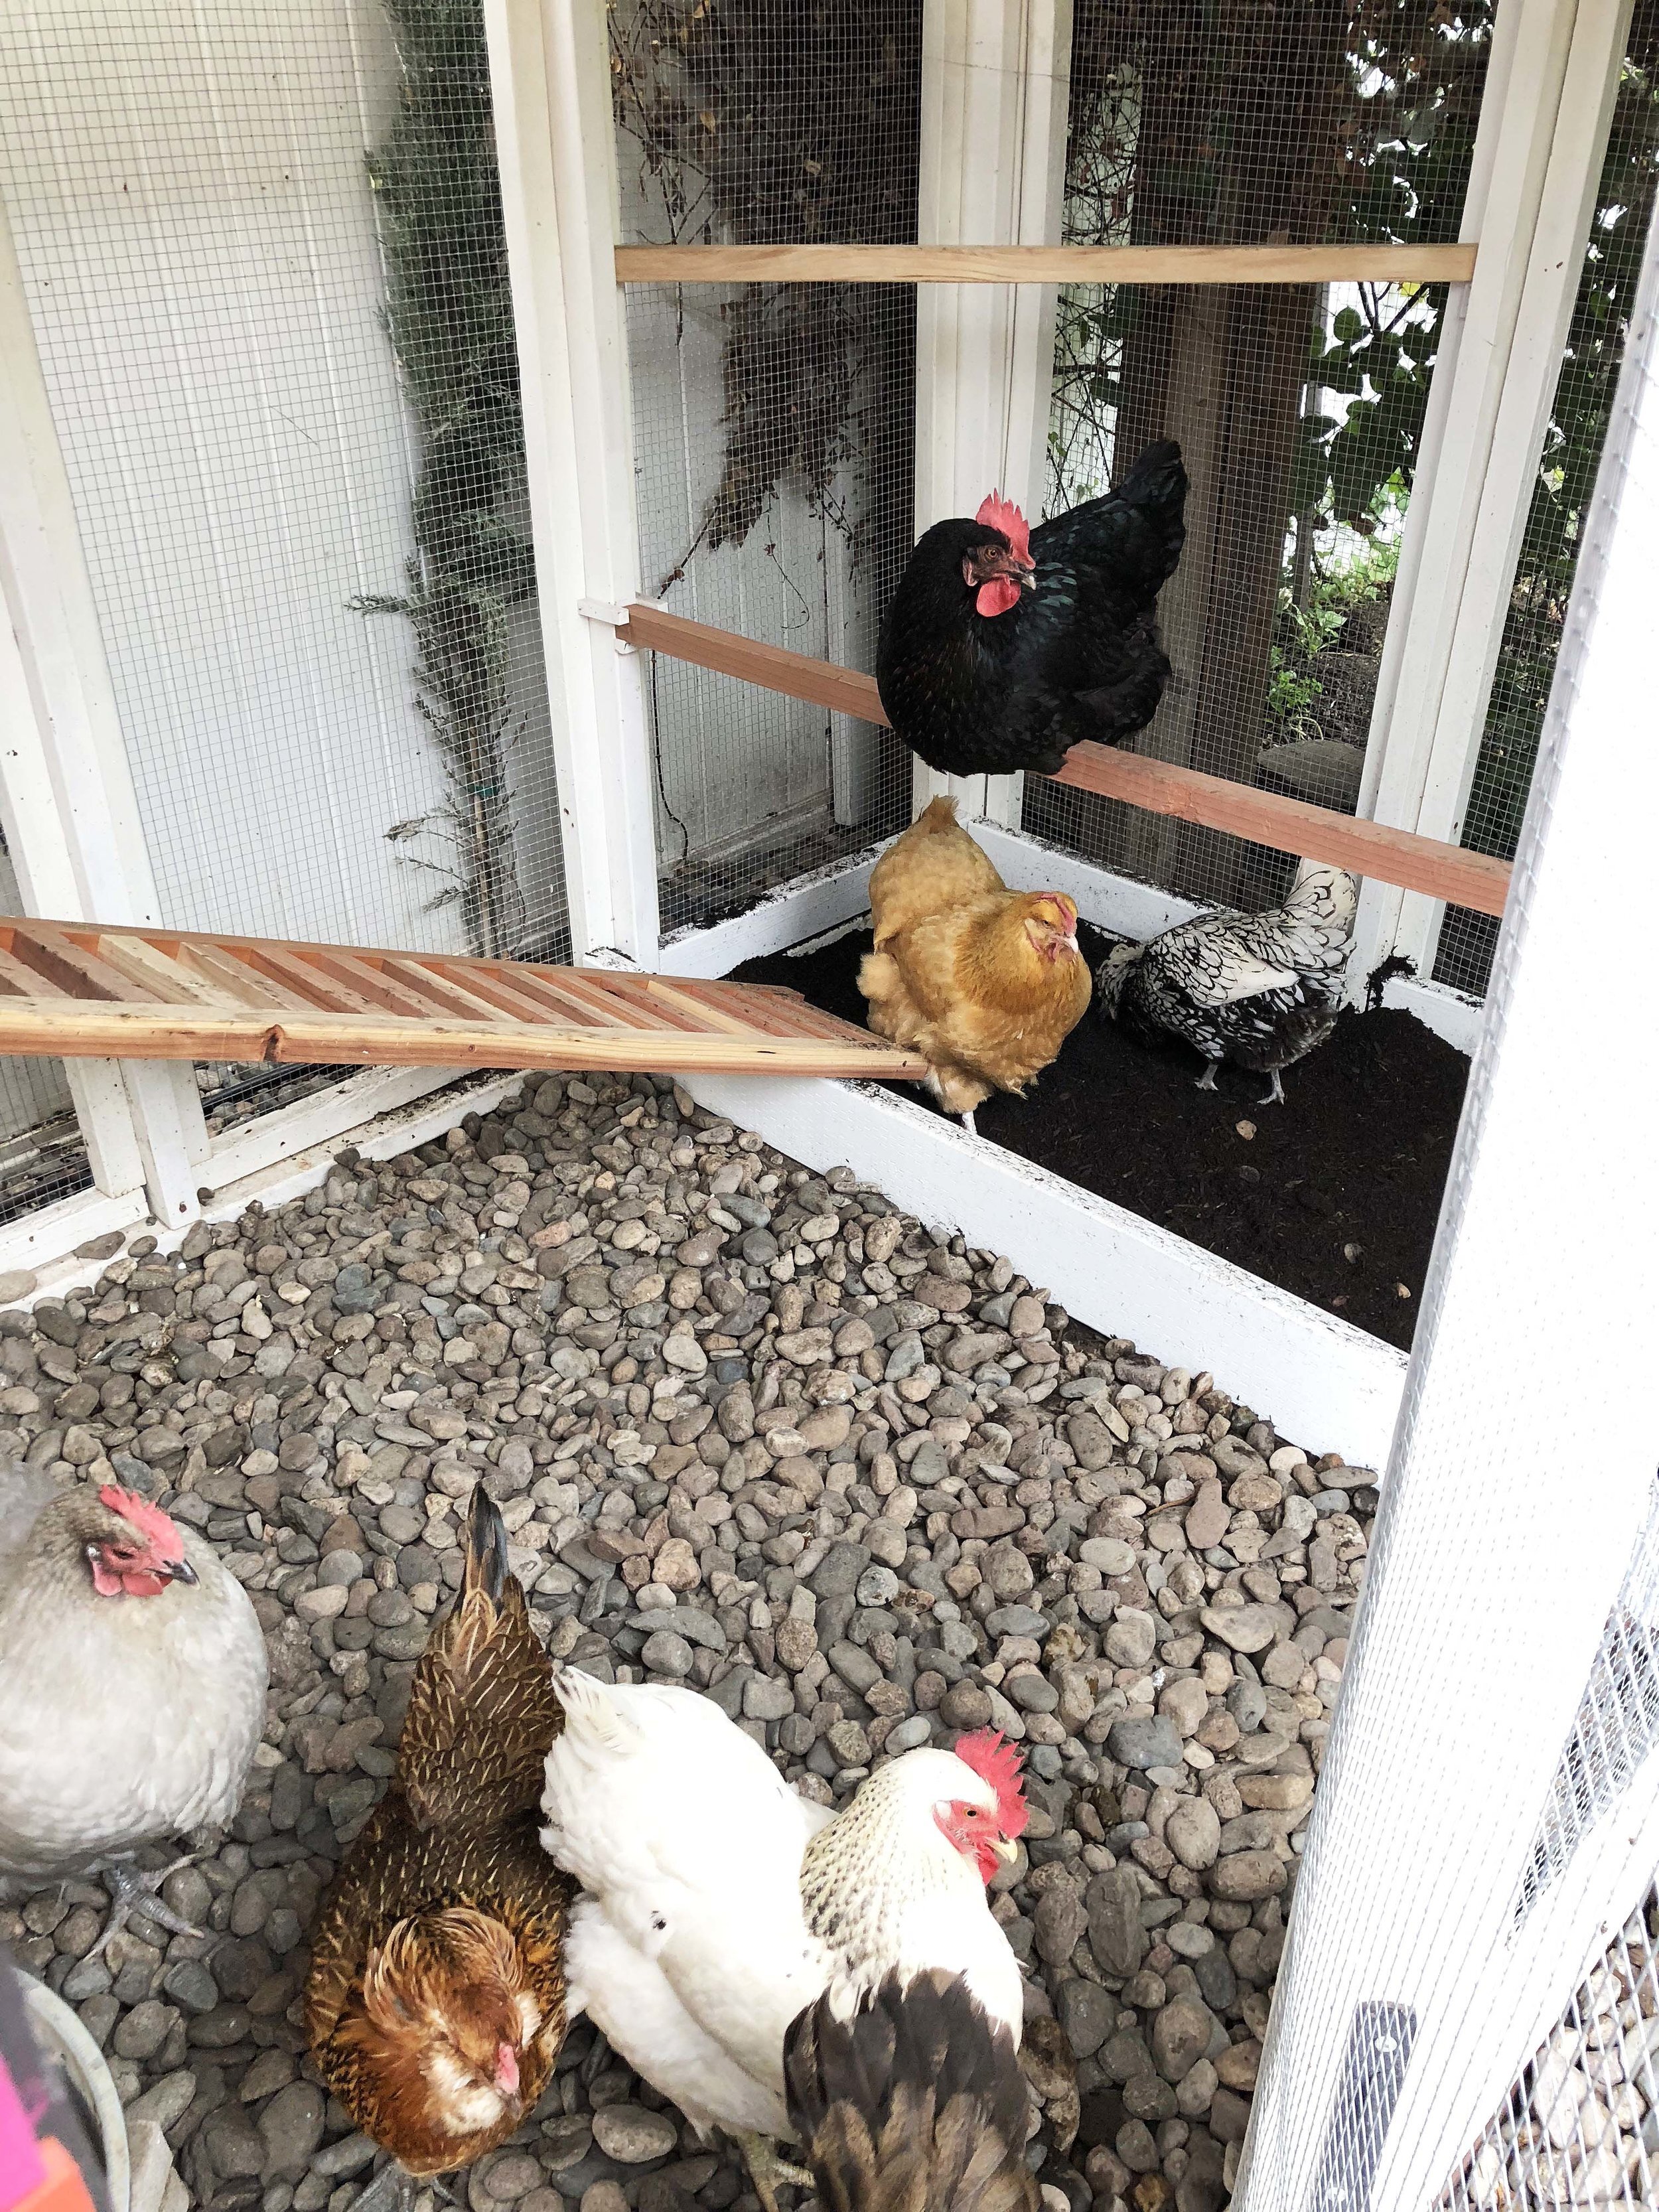
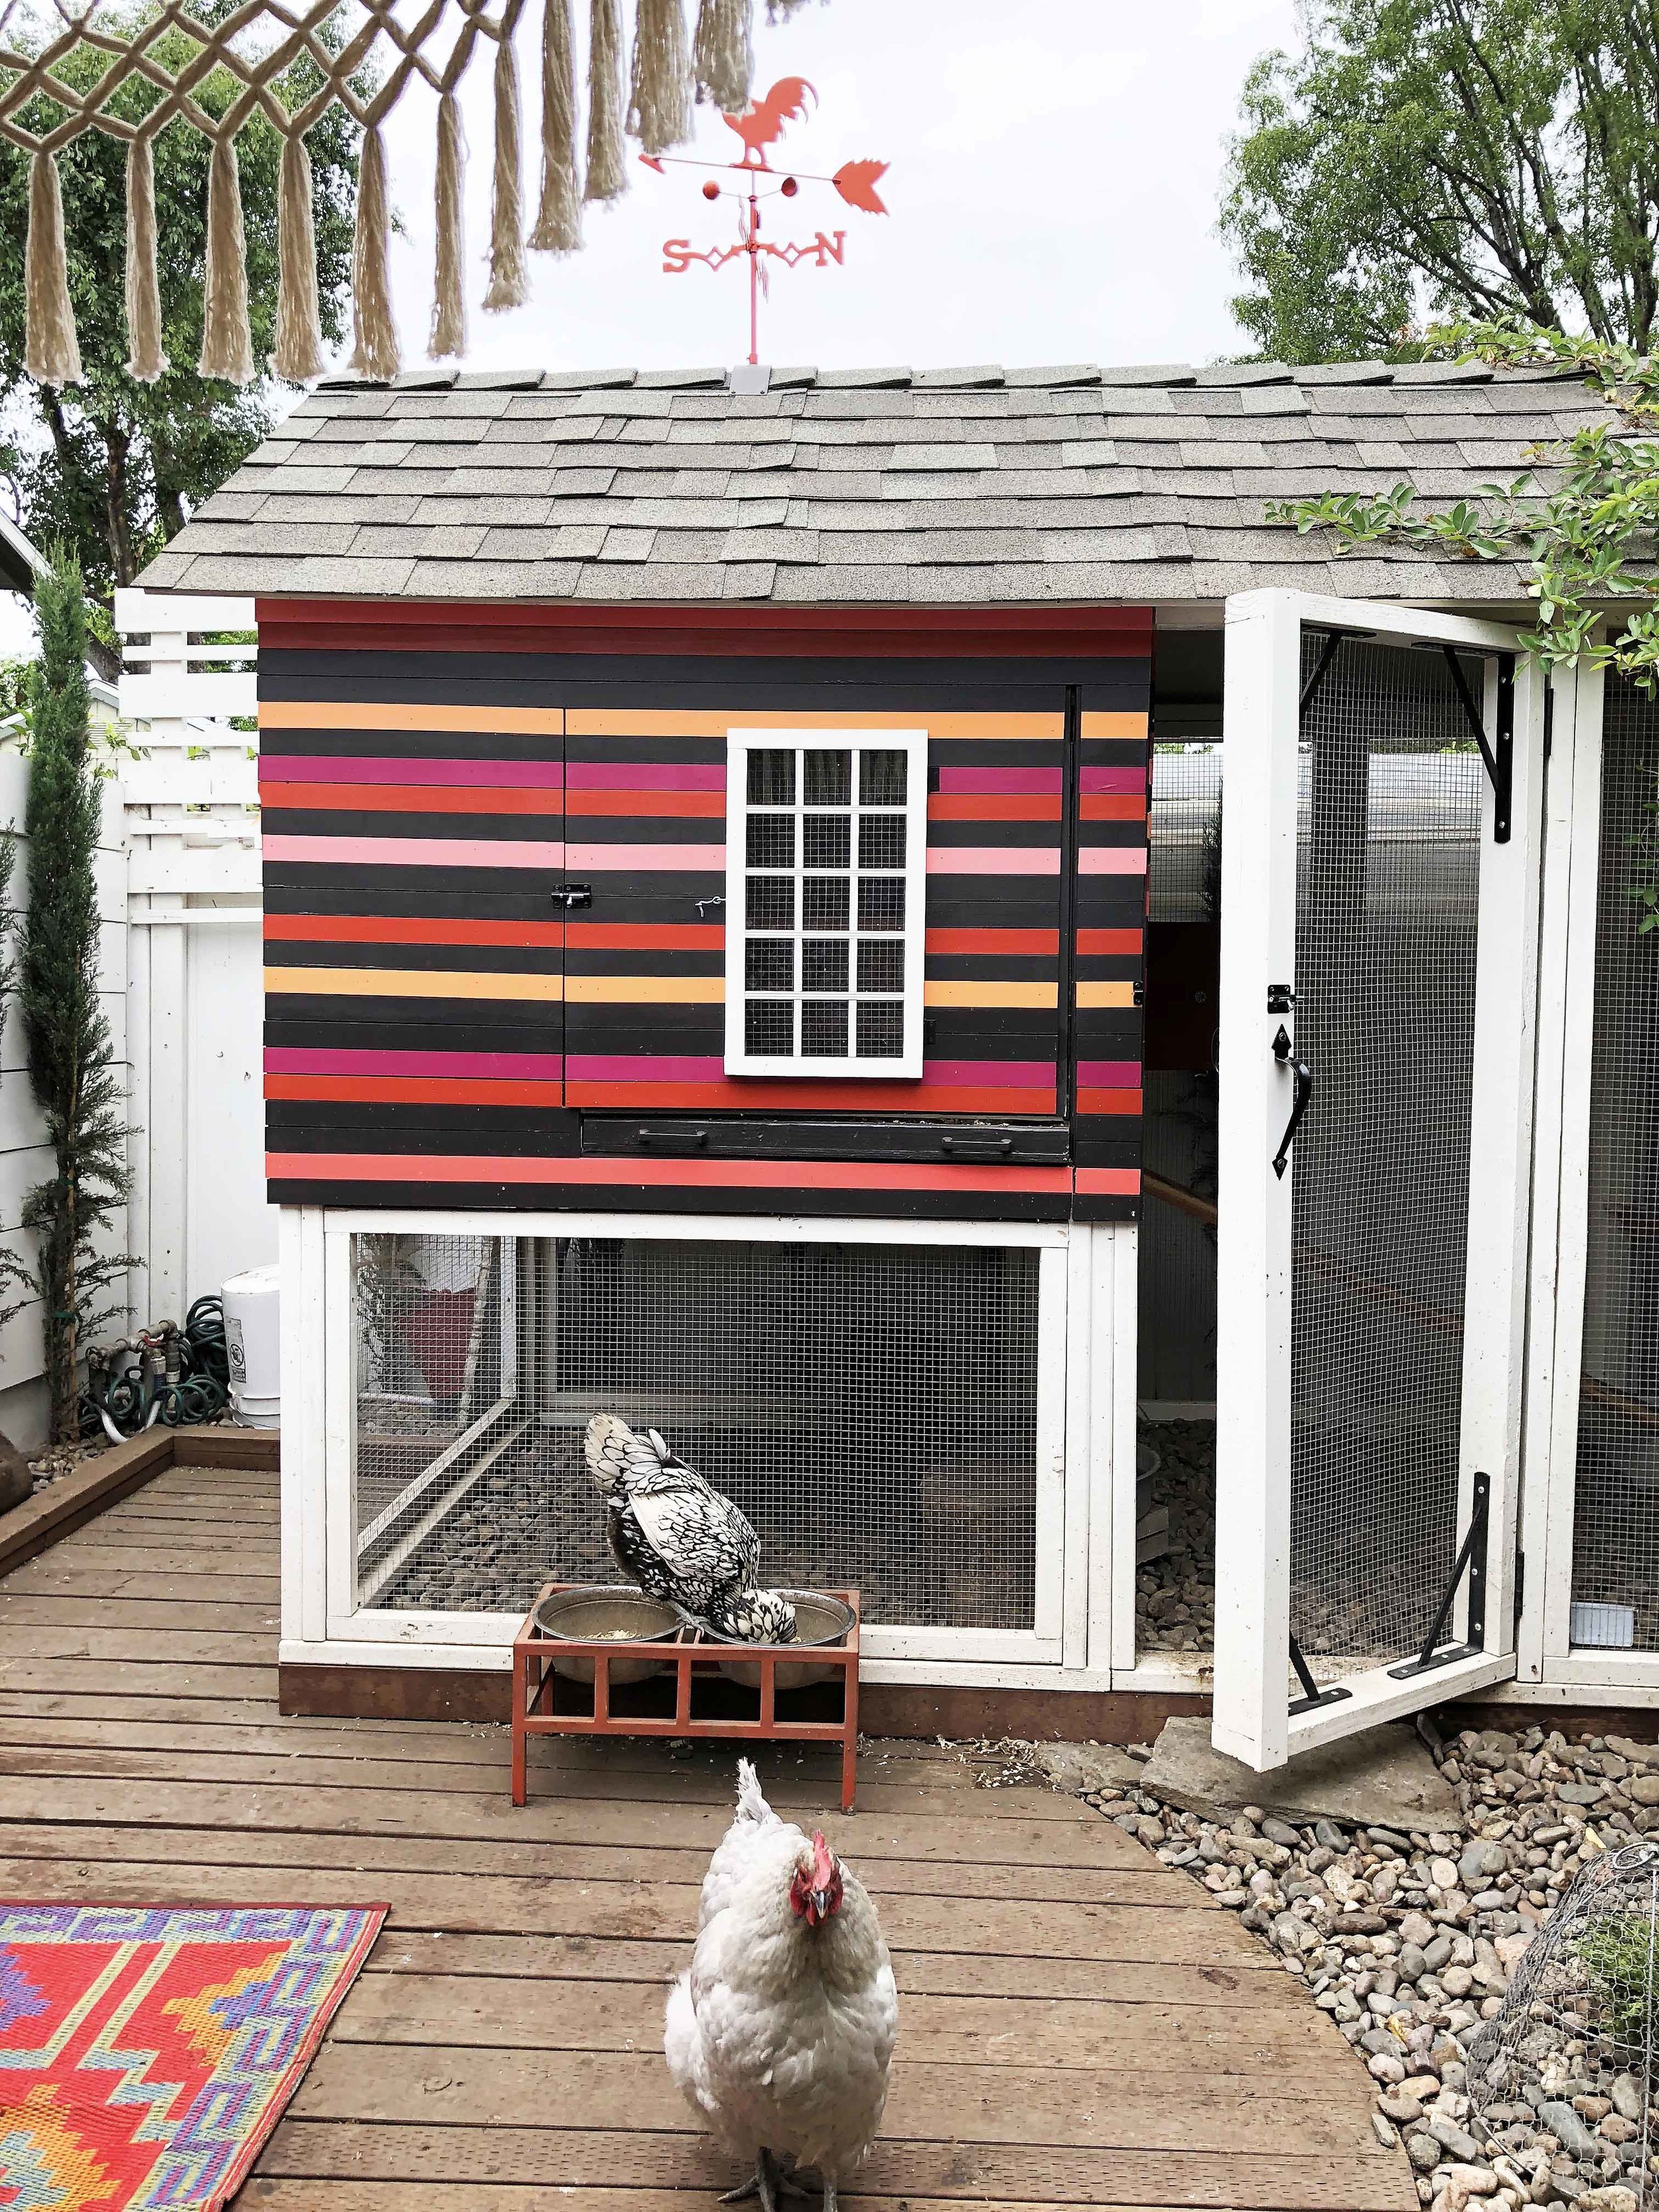
The run floor is covered in about a foot of pond pebble-sized gravel (over the top of a layer of hardware cloth to ensure nothing digs up from underneath), with a dedicated dirt-bath area at one end. So when the chickens are incarcerated they still have dirt to peck around in and bathe in. We also have a series of roost bars up through the vertical space in the run to give them a little more breathing room.
Now let's tour the henhouse, shall we? Yes, yes we shall.

In addition to a fully insulated and shingled roof that is shared with the run, the henhouse features studded and insulated walls (which though we don't get super cold winter temps, we find that the insulation helps with keeping things temperate when we do get the extreme summer temps that we sometimes do...as I write this, it is 108 degrees outside). The front wall opens like a door as access to the nesting boxes just to the left inside, but it also features an acrylic window that opens to a hardwire cloth-covered cut out which provides much needed ventilation (but also can be closed up in the winter for added warmth). There are pull-out trays just below this door that provide easy access to the henhouse bedding for deep cleaning. Inside the run, the north henhouse wall also opens for easy cleaning, and also features a chicken door for the girls to go in and out of. The south side of the henhouse includes a built-in storage/feed closet.

The henhouse run access features a hen-sized door and a ladder ramp for daily chicken catwalking.
And: WALLPAPER. We get a lot of questions about our coop wallpaper. Many people want to chalk this up to a silly aesthetic gimmick (OMGEEEEEEEEE IT'S SO INSTAGRAMMABLE!!!)--and while it is super cute and that is a HUGE bonus IMO, in real life, it's actually a completely practical choice. HEAR ME OUT. Most coops are built of wood--probably plywood. And even when you paint that stuff--it is still super rough and porous. It. Is. Hard. To. Clean. Fresh Eggs Daily has always used contact paper as wallpaper in her coop---it's easy to apply, and SO easy to clean--this is where I got the idea that I needed to have something applied to the coop walls for easy cleaning, but I couldn't for the life of my find a pattern that I really loved. Ultimately, I stumbled across the fabulous removable wallpaper options thru Spoonflower.com. If you're not familiar with it, this is a site where artists upload their designs and you can have fabric, wallpaper, and wrapping paper made from them. You can do traditional wallpaper, and you can also do self-sticking wallpaper (which is awesome for rental living situations...and also CHICKEN COOPS). Not only is there an unending wealth of independent artist-created designs to choose from, theoretically, you can upload your own design to use! Yanno. If you wanted. Aside from all that fabulousness, the removable wallpaper is very wipeable and cleanable, which makes it PERFECT as a wall surface for a coop--way easier to clean this stuff than it is to clean painted or plain plywood. My one caveat is that, while this stuff sticks up on its own, the stickiness is not strong enough for a coop situation and you will need to also staple it into place.
This particular, gorgeous design is by Sarah Treu on Spoonflower.
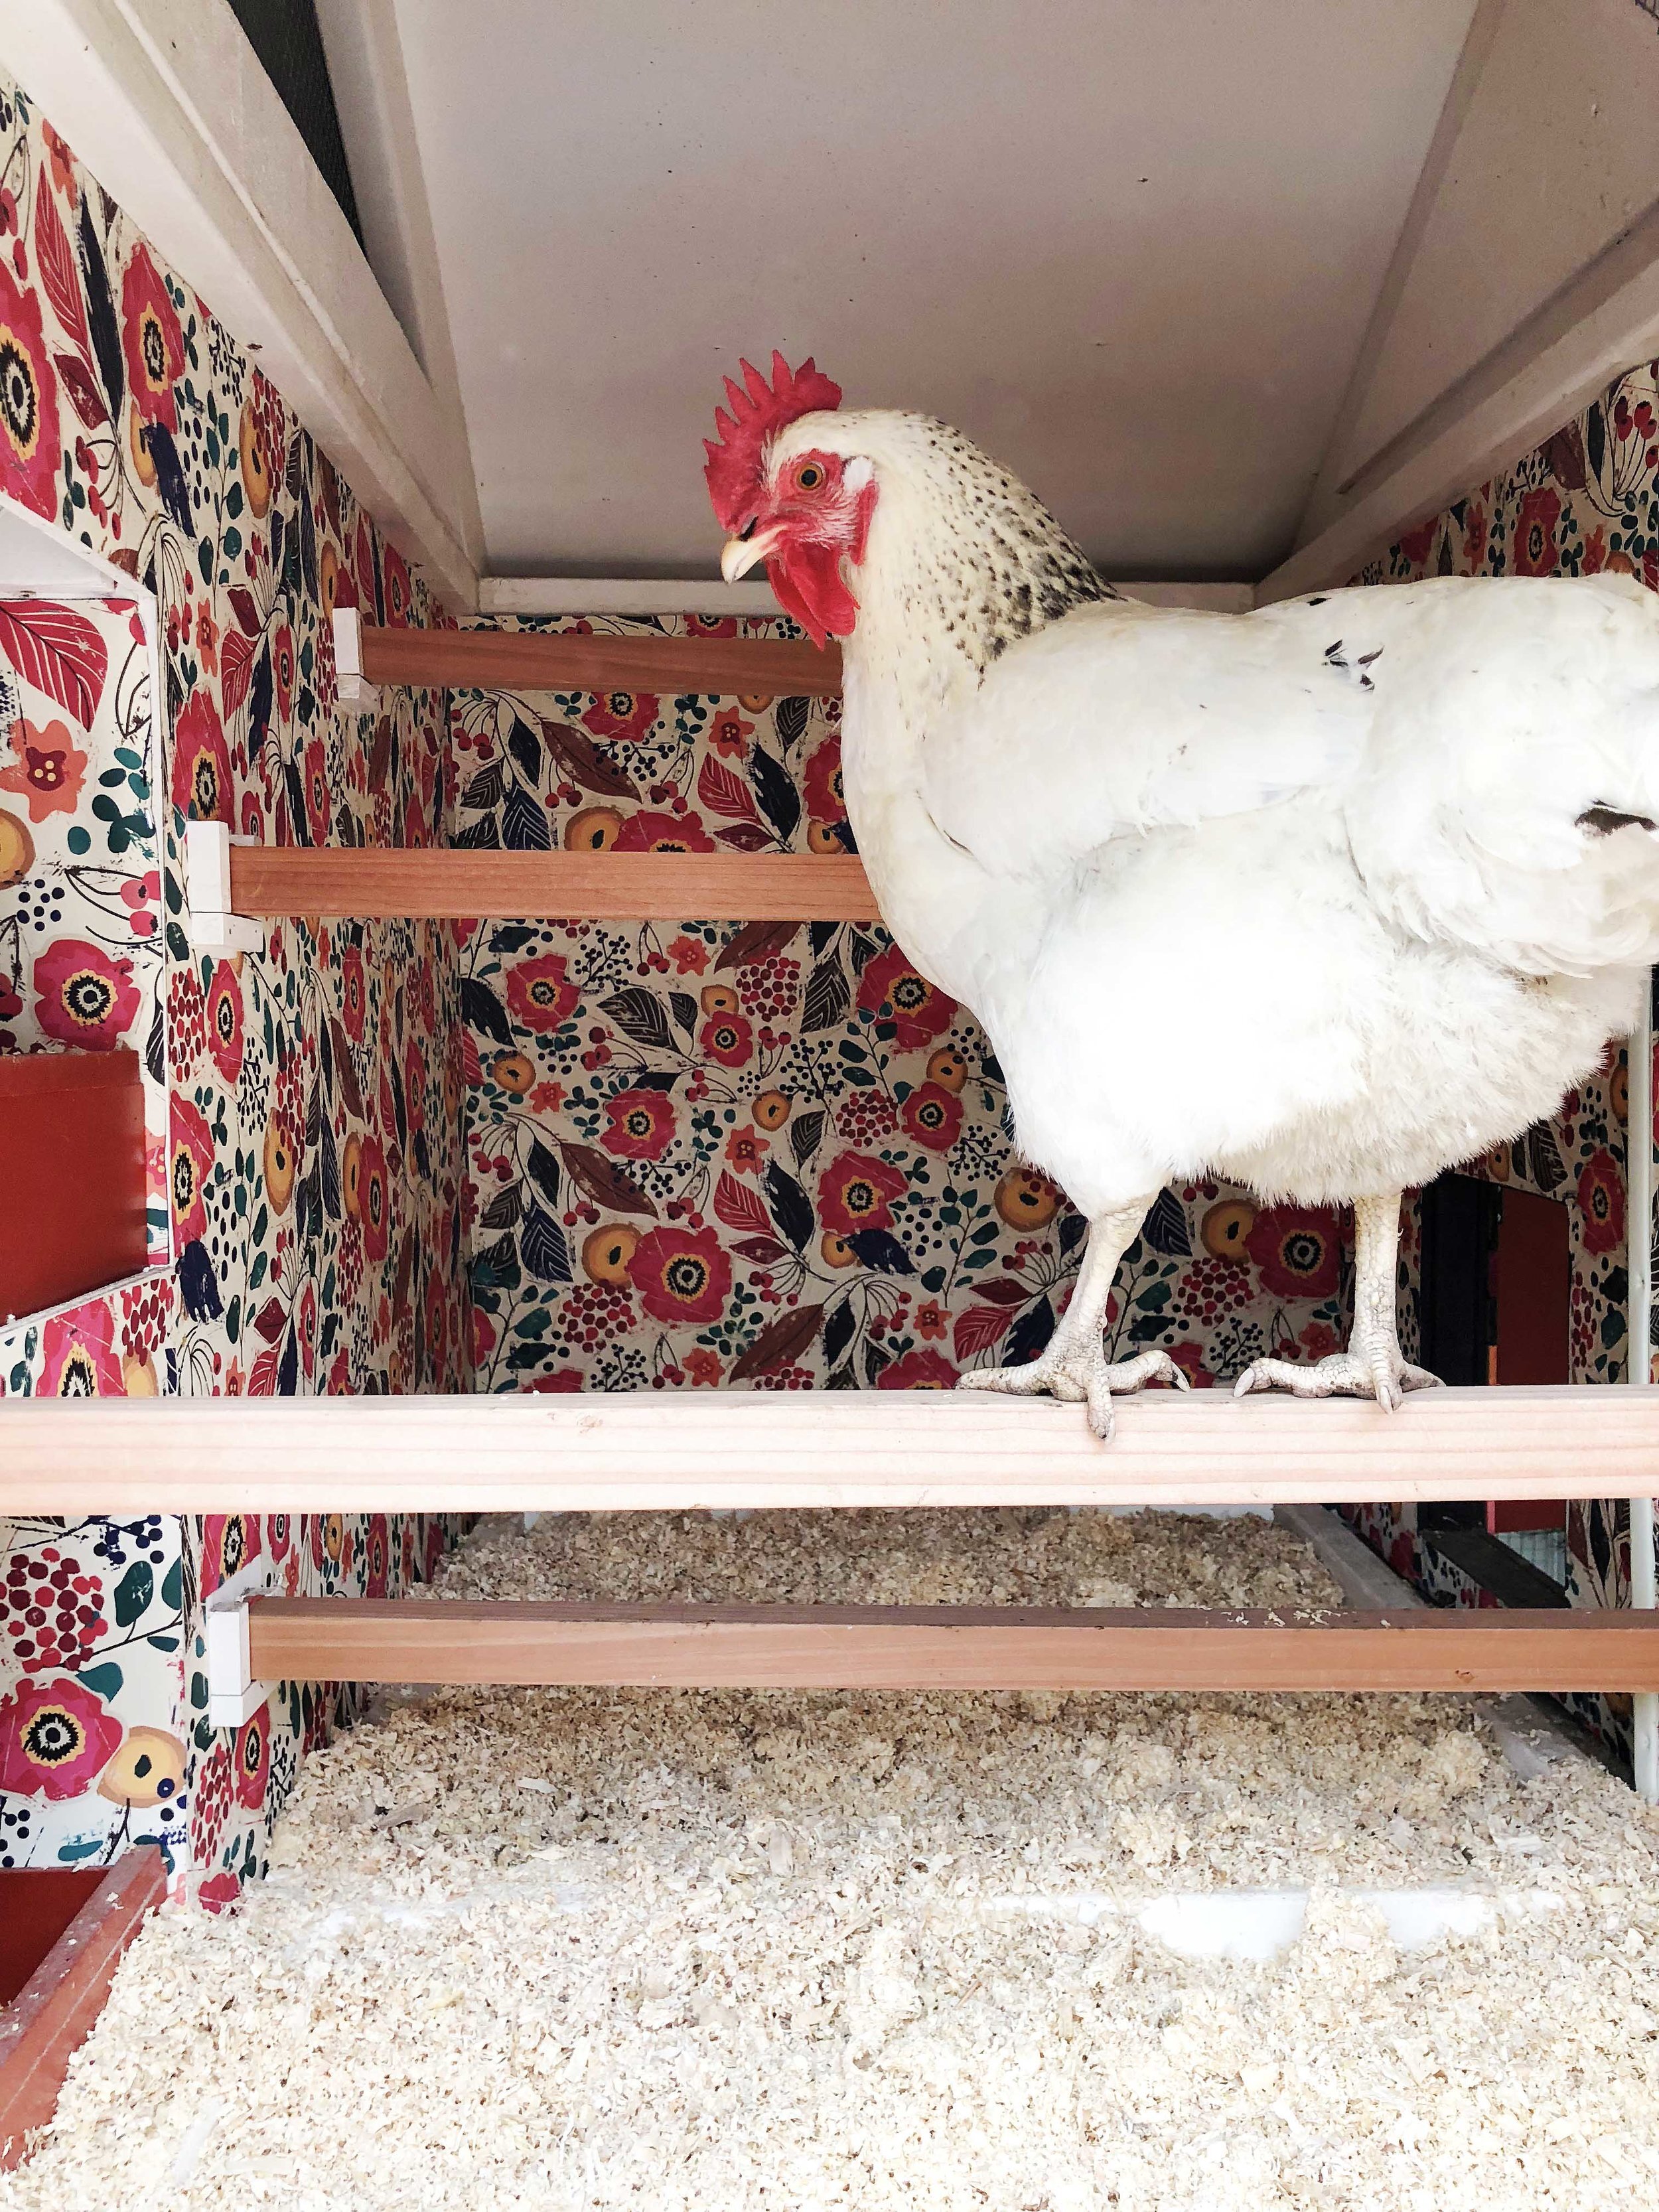
Not only is coop wallpaper adorable and easy to clean, but a busy, colorful design does a great job of hiding, er...splatters.

Nesting box situation. *With cranky AF broody chicken.
The four nesting boxes pull out of their cubbies for easy cleaning (four, even though the brats all fight over using the same one). I use pine shavings as bedding both inside the roost area and in the nesting boxes, (I found it to be easier to scoop and clean than straw-though straw is a great option too-- I also adore the smell of pine shavings and they do a fabulous job of deodorizing) and in the boxes I often mix in Coop Confetti herbal blend-- it makes everything smell even better, and it looks pretty too. The chickens care. They really, really do.
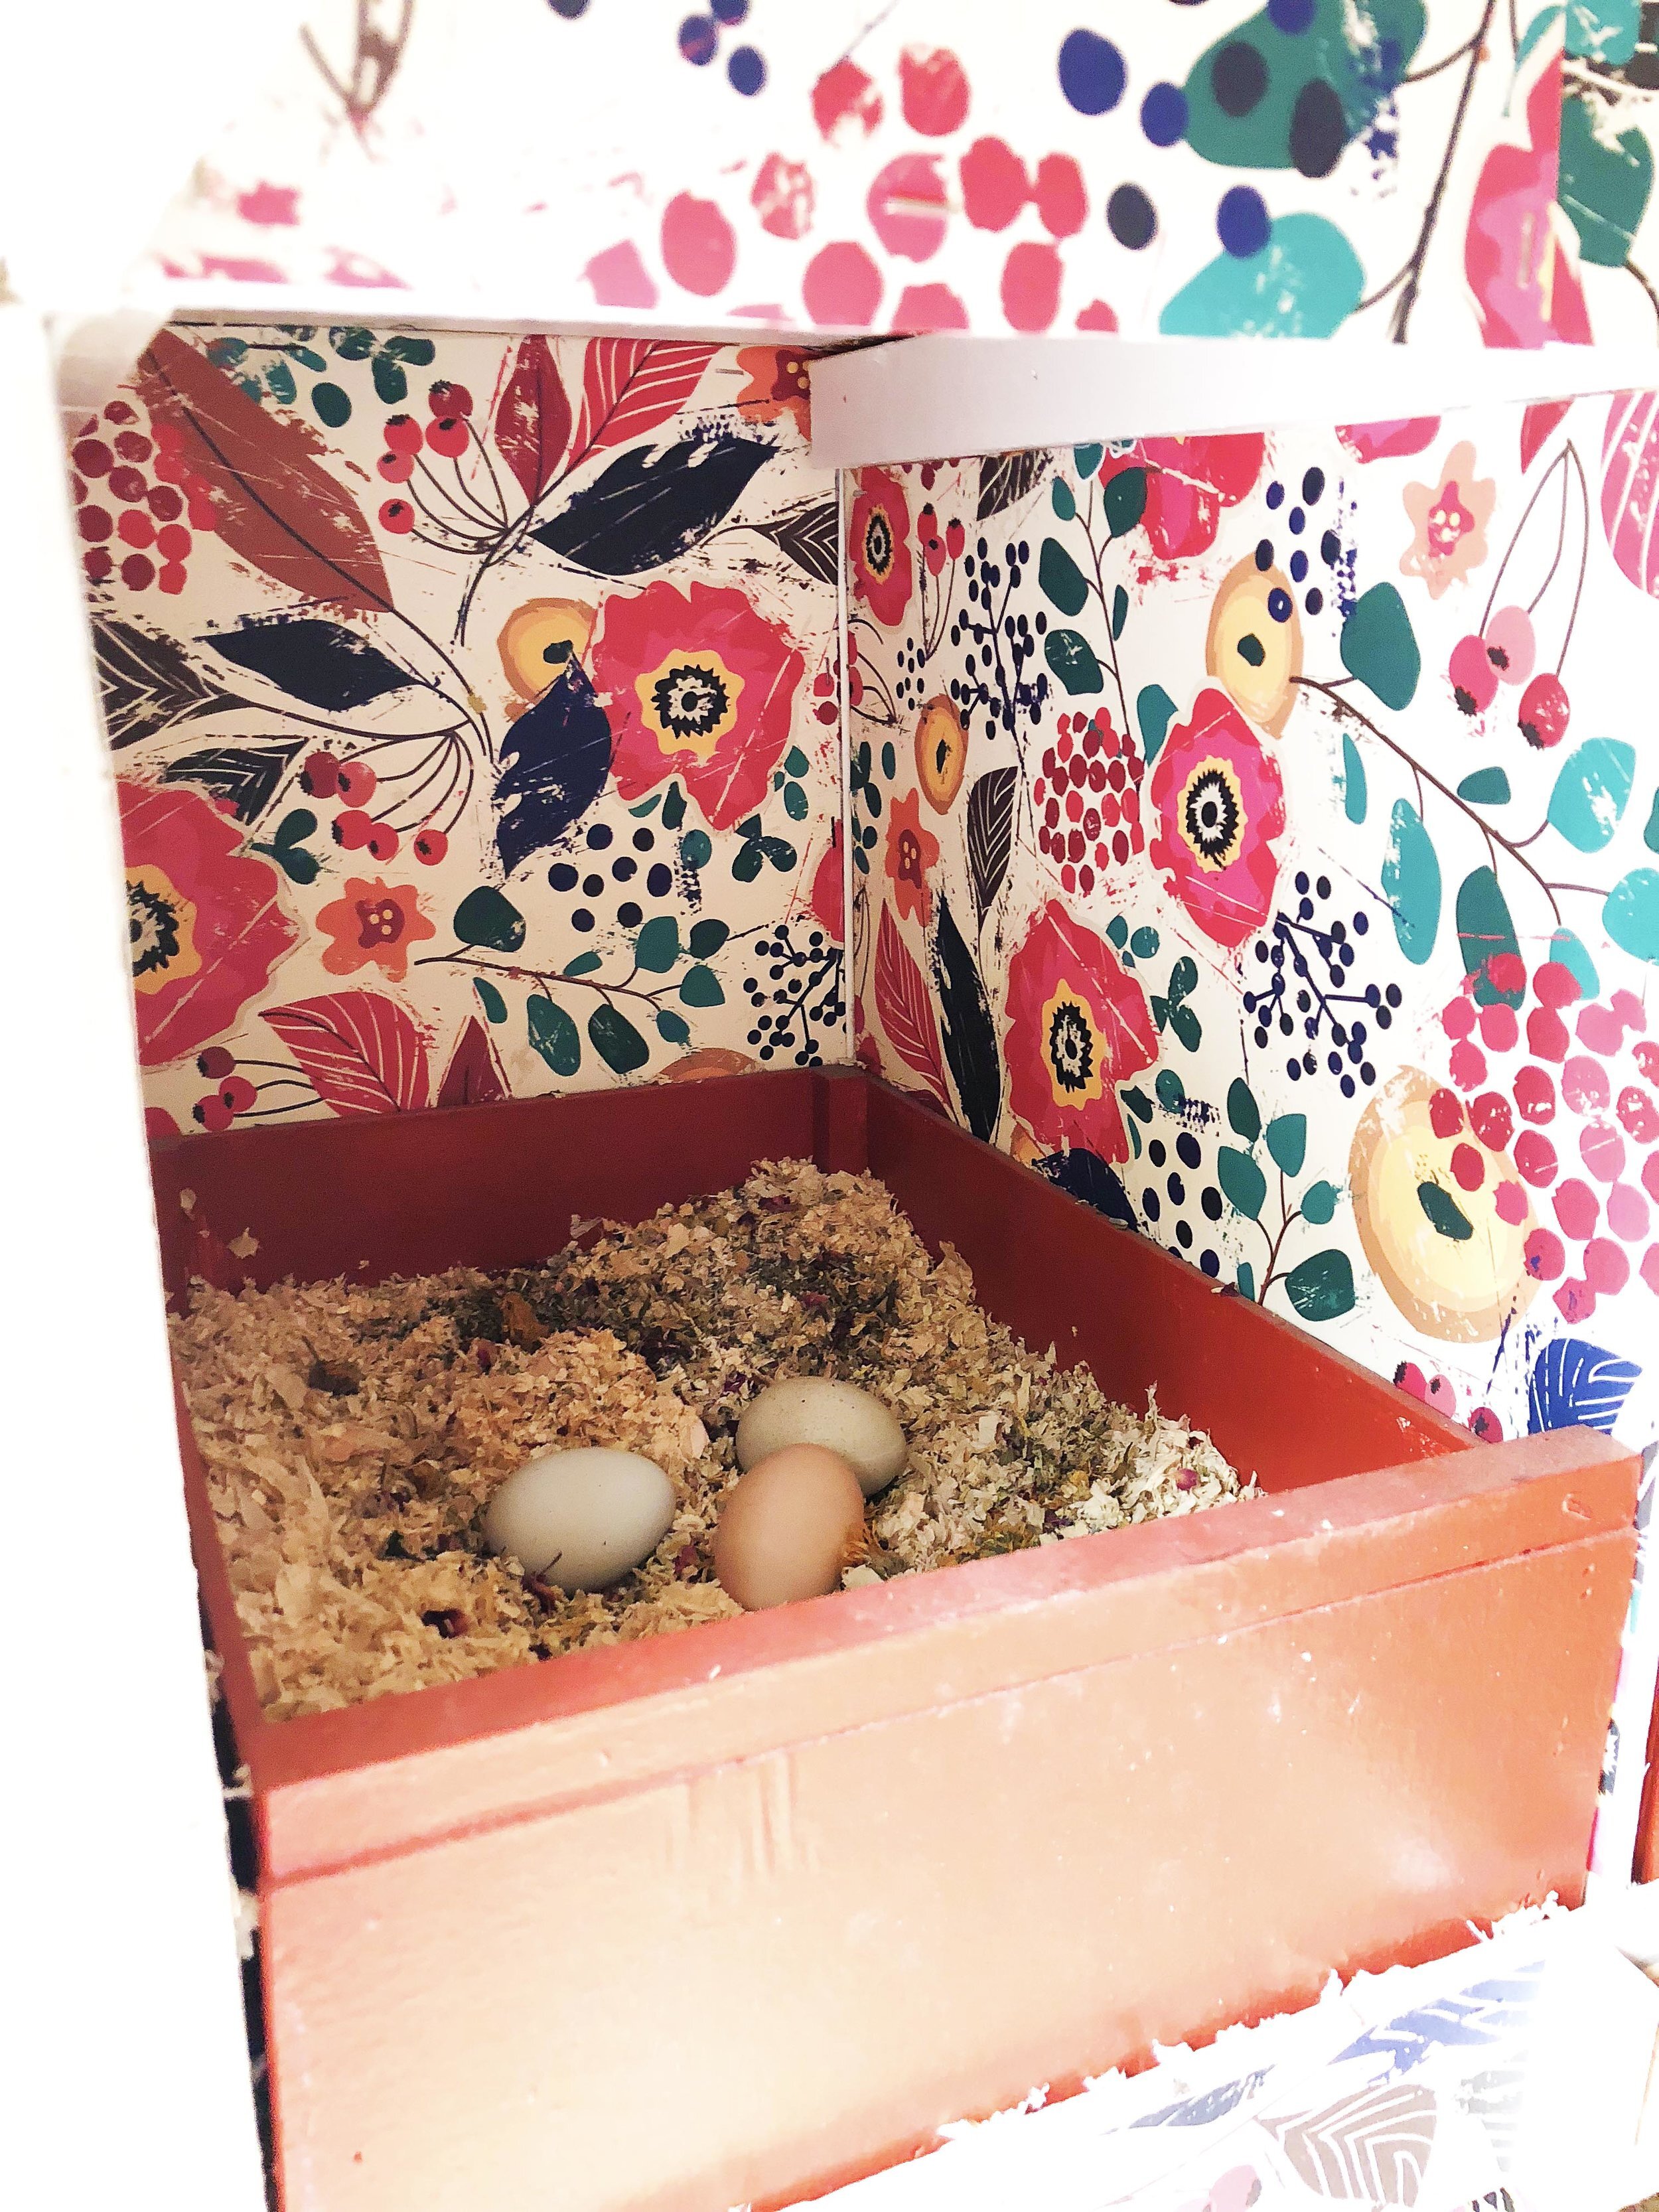
A little Coop Confetti sprinkled throughout the nesting box makes everything better.
So now let's talk about landscaping. I get a lot of questions about how the hell I have landscaping AND chickens. When we got our first set of chickens, I had this beautiful little dream of them free-ranging the whole yard and garden. For awhile, that's what we did. And it was kind of a joy to look out the window and see them trotting through the yard, or look up and lock eyes with one staring intensely in through the side door. But quickly we realized the downsides of this situation: there was poop everywhere, they were gleefully destructive of ALL our landscaping, and with the wide open spaces of the driveway and yard, it left them very prone to hawk attacks (fortunately, we never lost one to a hawk, but dang there were some very close calls, including one being actually lifted a few feet off the ground and then dropped unscathed). Not too long into our chickening adventures, I realized that they needed to have a dedicated garden of their own that was more protective. So we fenced off the back of our property and created the chicken garden. While it is still technically free-ranging, the area is closed in by very tall, secure fences and overgrown vines. We set out patio umbrellas for extra shade and aerial protection. Additionally, we routinely bring our dogs back to hang out in the Chicken Garden in order to leave their scent in hopes of discouraging other types of predators from being too interested in coming in. We let them free range in the chicken garden when we are home, and when we have to leave at all, we lock them into their new, bigger run (the old coop and run was not big enough for this and it was really tricky to safely leave them for long periods of time).
As for landscaping, we already had established, mature climbing roses growing in that area of the garden. The chickens pick the vines clean to slightly above chicken height, but other than that, the vines flourish here. Tall, mature plants are hard for chickens to destroy, it's the young, small ones you've got to protect. After our recent re-design, we have added some pots of herbs and flowers that are protected with chicken wire cloches and/or fencing, a few bougainvillea vines that, once they are big enough can be unprotected just like the rose vines, as well as some evergreen plants that the chickens aren't too interested in eating.
I do let the chickens out into our main garden for highly supervised visits. I routinely let them de-weed our dirt pathways; they are remarkably efficient at it. But you absolutely have to stay on top of them. They'll veer off and rip out an entire tomato plant in five seconds if you're not careful.
Additionally, we plan to install a vertical garden situation on that blank back fence--so stay tuned for that.
For the record--I move a lot of our protective fencing when I photograph the area, or when I have friends over for drinks because it's a little more pleasant to look at when there's not fencing everywhere. But on a normal day-to-day basis, this is what it looks like:
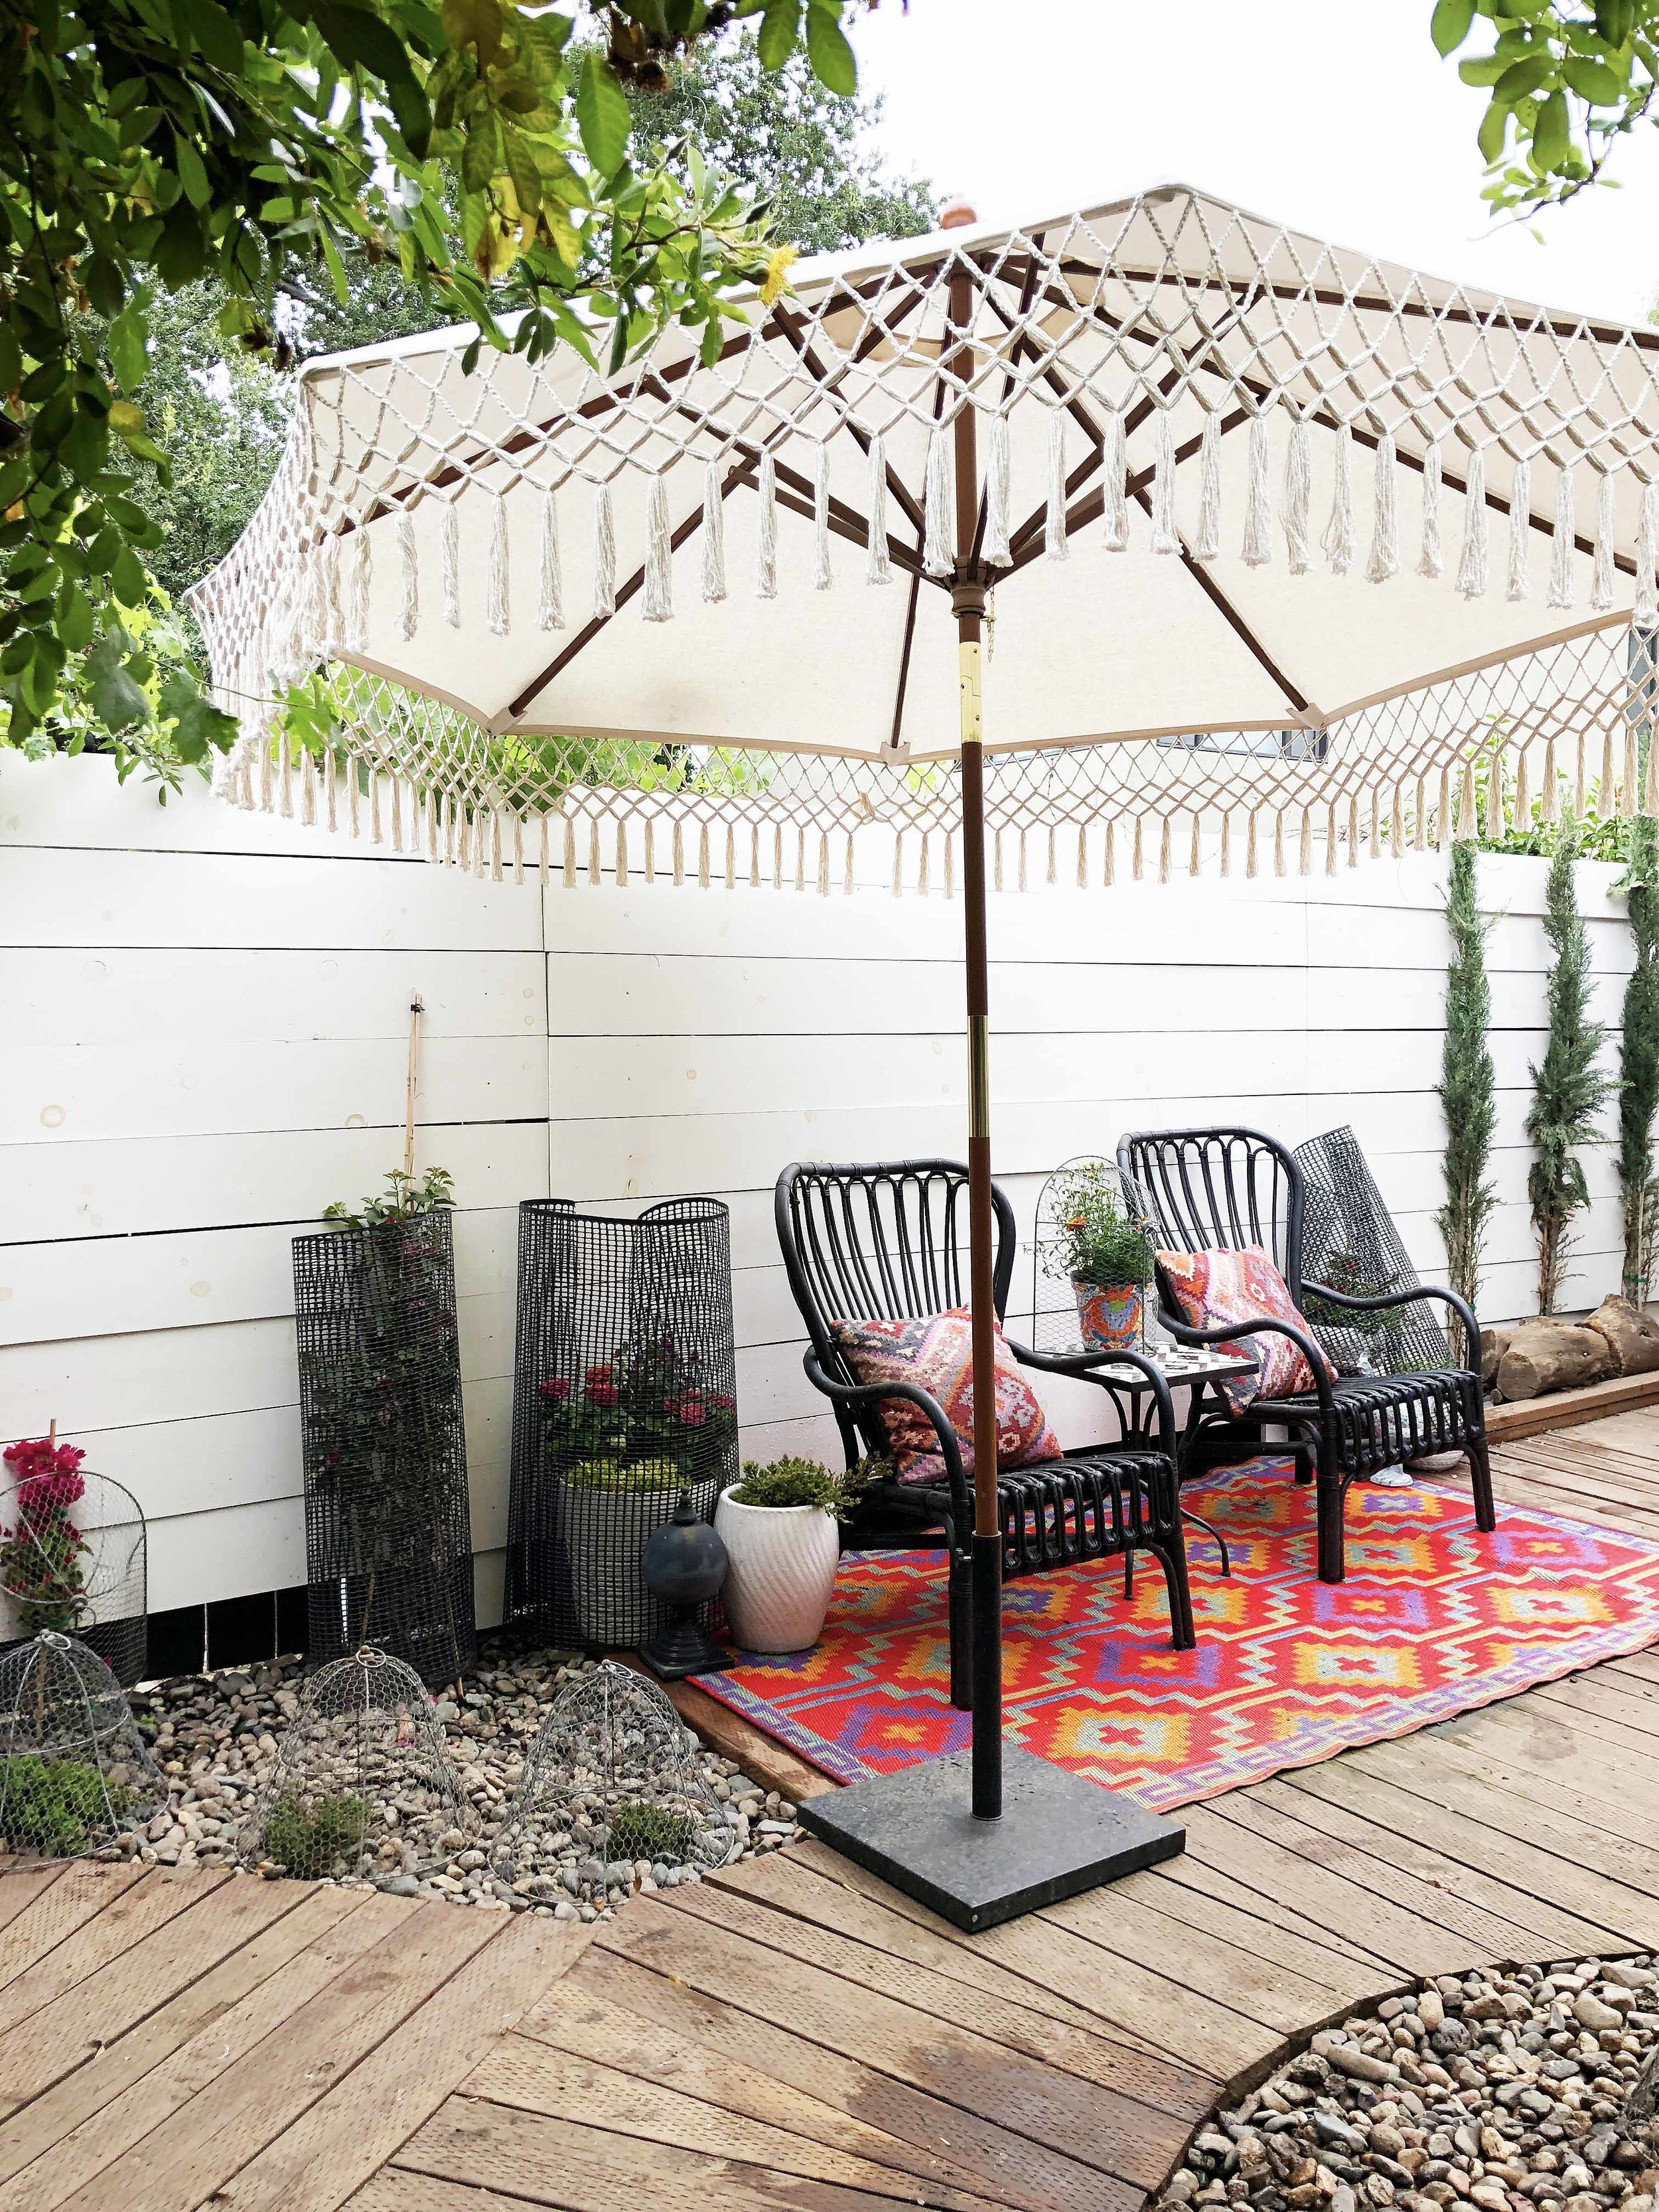
Imagine herbs and flowers growing vertically alllllllll along that back fence!
Also, because my chickens don't get to free range in the main garden every day, I plan to have a rotating series of moveable planters that I will grow a good, healthy foraging blend in for them to pick at. Just gotta...yanno...get those damned planters built.

And, of course, I must mention that beyond the frog fountain, through the colorful gate, is the Chicken Bar. For to drink with poultry.
Look for more fun Chicken Bar and Garden projects coming soon!! Keep up to date by signing up for our forthcoming newsletter.
Resources on Chicken Keeping:
Information on literally every aspect of natural chicken-keeping: Fresh Eggs Daily
Hobby Farms has a pretty comprehensive chicken-keeping section
Books in my Chicken Keeping Library:
Fresh Eggs Daily: Raising Happy, Healthy Chickens...Naturally, by Lisa Steele
Gardening with Chickens: Plans and Plants for You and Your Hens by Lisa Steele
The Chicken Health Handbook by Gail Damerow
Storey's Guide to Raising Chickens by Gail Damerow
Food and Supplements We Use:
Nutrena Naturewise Layer Pellets alternated with My Urban Coop Chicken Chew Plump Pumpkin, Frisky Flax, and Homestyle Hemp feeds
Scratch and Peck Feeds Cluckin' Good Oyster Shell (kept in a dish as a free-choice supplement)
Fresh Eggs Daily Coop Kelp and Brewer's Yeast Supplements (added occasionally to food as a supplement)
Freeze-dried Meal Worms (as a limited treat)
Peaceful Valley Farm Supply Foraging Seed Blend (grown and fed as a dietary supplement)
Henhouse and Nesting Box Materials:
Kiln-dried pine shavings such as Manna Pro's
Scratch and Peck Feeds Coop Confetti
Diatomaceous Earth as needed for pest control
We use this automatic waterer inside the run
I think that's about it! If you have any other specific questions, please leave them in the comments and I will try to answer as best I can!